I really like the author’s enthusiasm in the haptic technology ( or any kind of technology that could create the described effect of a more realistic interaction). After I rewatched the video, it does feel that all the gadgets there are just better, bigger, thinner and more transparent iphones. Perhaps the author is describing something so futuristic that very few of us can even imagine what it is.
Let’s say in the future some sort of nano robots can let you “flip” a page, or let you “touch” your partner’s hand while you are thousands of miles away from each other. However, is that really a “page” you are flipping and a human hand you are touching. They sure feel like they are. Nobody would want to read an actual book because your computer would feel like a real book in every way to a point people would fail to distinguish a computer simulated feeling from a “real” feeling. Your computer is not just a thing, it becomes everything. Would that necessarily be a bad thing? I don’t know. But it will completely change the way humans perceive the world
The author is “ranting” about some people’s expectation of how our designs in the future looks like. He believes that the “Picture under Glass” interface, like those on our phones and TVs and computers, is nothing but a transitional phase to a more interactive and “sensory” designs in the future.
I have mixed feelings about the author’s opinion. He points out that we should not limit our interaction to only with our fingertips and the sensation we get from interacting with real life objects give us way more information than a touch screen. We are already so used to screens and we all know what to do when we interact with phones or computers. In addition, touchscreens are very versatile. However, I do enjoy the sensation of flipping a page when I read, or holding a “gun” when I play shooting games and not to mention I REALLY miss writing Chinese with a pen rather than a keyboard. Anyway, I will be very excited if interaction with interfaces of any kind resembles interaction with real objects in the future.
Want to practice your favourite piano piece at home? Too broke to buy an actual piano? Worry not! Introducing the Luxurious Low-budget Piano Set (LLPS)! With only$9999.99, you will have this amazing piano in your home tomorrow! Order now we will give you a metronome FOR FREE!! Call at 54-320-7668 now and get the piano set of your dream!
#include <Tone.h>
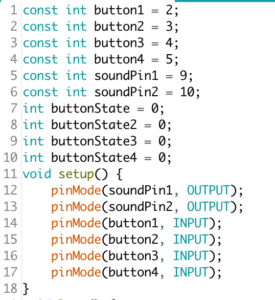
const int buttonC = 2;
const int buttonD = 3;
const int buttonE = 4;
const int buttonF = 5;
const int buttonG = 6;
const int buttonA = 7;
const int buttonB = 8;
const int buttonC2 = 9;
Our idea is simple: make a piano with each key correspond to a different tone. So we have eight buttons and one buzzer that produces the tone. We were quite frustrated in the beginning because the buzzer would beep non-stop without any input. After making sure that our code was bug-free, we discovered that there are two reasons that could cause this problem:
the power is not connected properly. In our case, we were not aware that for the long breadboard, the bottom part and the top part of the busbar are not connected. The power was connected to the top and one of our buttons was connected to the bottom.
the output wire has to be parallel to ground. We soldered a button another way around so that the input was always on.
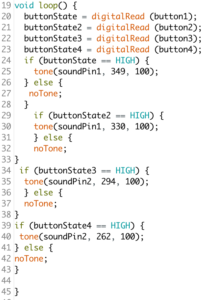
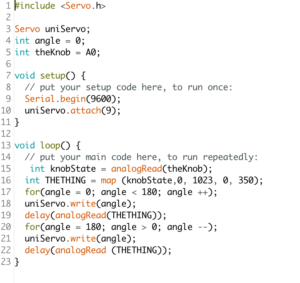
#include <Servo.h>
Servo myservo; // create servo object to control a servo
//const int potpin = A0; // analog pin used to connect the potentiometer
const int metronome = 6;
const int soundPin = 11;
//int val; // variable to read the value from the analog pin
int BPM = 60;
void setup() {
pinMode (soundPin, OUTPUT);
myservo.attach(metronome); // attaches the servo on pin 9 to the servo object
Serial.begin(9600);
}
void loop() {
// val = analogRead(potpin); // reads the value of the potentiometer (value between 0 and 1023)
// val = map(val, 0, 1023, 0, 180); // scale it to use it with the servo (value between 0 and 180)
myservo.write (105 + 30);
tone (soundPin, 500);
delay (50);
noTone (soundPin);
delay ((60/BPM)*1000);
myservo.write (105 – 40);
tone (soundPin, 500);
delay (50);
noTone (soundPin);
delay ((60/BPM)*1000);
// myservo.write(val); // sets the servo position according to the scaled value
// delay(15); // waits for the servo to get there
}
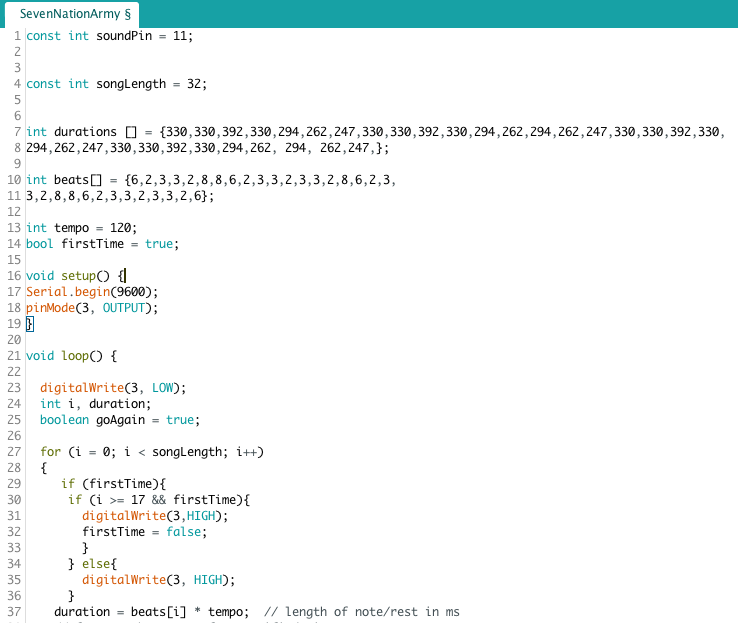
We created the metronome by looping a back and forth motion on the servo motor. The rate at which the metronome operated is determined by the length of the delay between every beat. The hand (connected to the motor) will tick once while the buzzer will also sound once for every beat. The metronome will be particularly helpful for beginners who have trouble keeping their songs in tempo.
I feel like the people in this response missed the point that Victor was trying to make. He wasn’t necessarily saying that the current design of ipads and touch screens are bad, but that they can be improved on and shouldn’t be the end of that design aspect. I think he also put things into perspective very well when he used the Hamlet and Dr. Suess comparison, even if it was a bit snippy at the audience member who asked the question.
That being said, he was a bit snarky about it which while I found a bit endearing, might make people a bit less open to hearing out his point.
Starting this project, we were initially confused as what we wanted it to do to give the illusion of a musical instrument. We started by talking about different mechanisms we could use that would have a chain-reaction type set up so that eventually a part of the set up would trigger the tone.
Then we decided that we wanted to instead utilize the different parts we have as a group of three and the resources provided. We decided to make a band!
We collectively worked on these, but to start we each began by working on a part of the project that would in the end all come together . We decided on three methods of creating sounds: 1) using buttons that trigger the notes 2) using a servo to produce sound with a physical object 3) using a potentiometer to create different notes.
1)Piano though buttons:
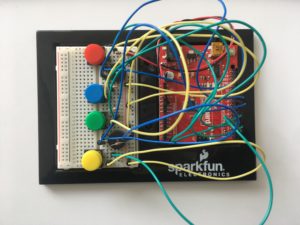
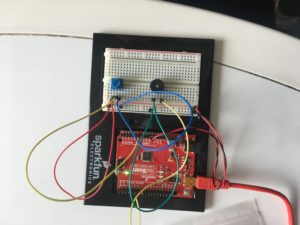
First, we set up the circuit which contained 4 buttons and 2 speakers:
We then set up the following code so that each button would produce a different note (C4, D4, E4, F4).
We decided to use two speakers instead of one so that different notes could be played simultaneously. In one of our experiments, we tried to get two buttons played simultaneously to produce another note, but the sound that produced didn’t sound like a note, rather a bleak pitch.
Alone, this is how this part of the project works:
2)Macarena:
For this part of the project, we originally started by wanting to program the speed of the servos movement so that it would hit another object and create a repetitive sound, like a drum. However, we couldn’t find the material to attach to the servo which would hit another material to create a big enough impact to generate a sound, and so we decided use the servo to create sound through a physical movement. Our first thought was bells- it would work well enough and produce a ring sound. Then, we experimented with a variety of materials that would produce sound alone, like beads. In the end, we created a little box with beads inside and glued it to the servo with hot glue like this:
We then created the following code so that the potentiometer would control the speed of the servo and allow us to control the tempo of the instrument:
Alone, this is how this part of the project works:
3)DJ knob Crescendo:
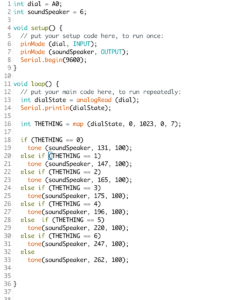
Lastly, we originally wanted to create a crescendo of sounds using a photosensor. There were many difficulties with this, especially the coding. However, after a lot of struggling, it worked. Until it didn’t. To fix the problem we decided to replace the photosensor, which had too many unknown variables, with a knob. In the coding, we mapped out the 0-1023 range into eight different notes: C3-C4.
To play it one would place their finger on the speaker in order to control the volume of the notes while the other hand utilizes the knob to change the notes.
This is how this part works by itself:
4)As a whole:
This is how all three parts work together:
Though not completely in sync, theoretically, if one is willing enough, one could learn how to make these instruments sound like a band.
When I watched the video, I felt like I was watching the futuristic people from the movie Wall-E. If you haven’t seen the film then let me tell you, people become technologically advanced to the point that they don’t even need to walk. While the video wasn’t that extreme, I felt it wasn’t showing what humans are capable of doing when interacting with this technology too. And this is what Mr. Bret Victor points out too. The reason I thank him so much is because he not only pointed this out, but built a good case on how important our hands are in this human capability/interaction.
Now, there are some issues with his logic, don’t get me wrong. He argues that the future shouldn’t be limited by doing things with simply one finger when we have our whole bodies, but I do not think this should be applied in all cases. This especially comes to mind after Marriane Petit’s Assistive Technology workshop that I attended in which technology is designed with the disabled in mind. In this case, using only one finger to navigate through various tech could be life changing for someone who has limited mobility. So the idea itself has amazing merit, but I do agree that it is not for everyone.
When we first began this project, Adham and I were a bit stuck for multiple reasons:
we couldn’t think of an instrument to make or how to use a real one. Like if we used a real guitar, how do we pluck the strings with only 2 servos? Should we plug in 4 servos? 6 or more?
how do we use a buzzer and a servo in unison???
and lastly, I would say the biggest problem we had was we both know absolutely nothing about music.
From there, we spotted an empty water jug and decided to work with it as a drum. We figured we could incorporate the buzzer later.
Building/Coding
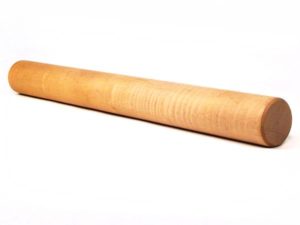
The building process was not difficult, as we just glued a wooden rod onto a servo, and filled an empty water jug about halfway.
From there, we connected the servo to our Arduino, but we ran into some issues because we thought we were going to use 2 servos. We ended up not using 2 servos but only 1, and our setup for the mechanism includes two Arduinos that are wired up together.
Splitting up the work load was a bit easier, as on one computer we had the code for the buzzer, and on another we had the program for our water jug drum.
From there, we just picked a song and programmed the bass of it into the buzzer, while our water jug would be the drum.
We couldn’t find the notes in an easy-to-read format for someone who cannot read music, and so programming the song into the buzzer took a bit of work, as we only vaguely knew what note was playing. (For example, a C note may have been playing, but we didn’t know if that was a C5, C4, or C3 etc.) So in order to code it, we mostly did it by ear.
Romeno and I initially had trouble coming up with a solid plan for what we should do. We thought of making some woodwind instruments, but we didn’t know how the servo would contribute towards this sort of project. We then decided that we wanted to do something like drumming, where you touch or hit something and it’ll make a noise.
I don’t remember why, but for some reason, we decided to use crocodile clips to clip onto some metal objects. Romeno coded (see his post) so that when touched, the buzzer and LED would light up. We first tried this project by clipping a coin to the crocodile clips and putting it on the servo so that it would spin, kind of like a record player. We wanted to imitate a stick-like object so that it would be like drumsticks but rather than hitting the coin, we kept the aluminium stick stable so that the coin would spin and touch the stick and make the buzzer sound. This is shown in the video below.
After that, we wanted to do something that was cooler and provided more than one sound. So rather than attaching the crocodile clips to the coin and making it spin on the servo, we attached it to a Sprite can so that when we touched the can, it would make the LED light up and the buzzer sound. This is shown in the video below.
We then did the same thing with another can but coded it so that the two cans, when touched, would play a different note (see Romeno’s code). We tried creating more cans that would make notes so that it would kind of resemble a piano, but we couldn’t figure out why when we tried to add another can/note, nothing would work. Therefore, we left it with only two cans/notes.
[UPDATE] We got 4 cans/notes to work/play, yay!!!
We couldn’t figure out what to do with the servo, but we thought that hey since we already have a piano-like instrument, why not make a set of drums to go with it! We attached a long ruler-like object that we found in the junk shelf onto the servo and used a cookie box as the drum kit so that when hit the lid and the bottom of the box, they would make sounds that could potentially resemble the bass drum and the hi-hat. The servo speed can be changed using the potentiometer so the beat could be changed to match the speed that you want to play the “piano” in. The code for that is shown below:
Our homemade instrument kit is now, therefore, complete! Below is a video of it!
A brief rant on the future of interactive design makes a claim that I find fundamentally interesting, that most visions of the future are too conservative, to similar to now. I find this quite interesting, because it seems that we have gone an awfully long time since Any new visions were seriously put forth. This article was written in 2011, and in the response he mentions that the iPad is good, but only if it gets replaced relatively quickly. 7 years later, and all of the handheld devices made by any company still are almost identical to the original iPhone, and with these companies current business models this is unlikely to change. I think this is a large part of the reason that progress has been relatively slow. Even at this time everything looks like what we grew up thinking of as “modern”, and so even without innovating much companies can sell their product as if it were a new and amazing thing, because it has the right aesthetic. No serious cultural force has put forth a competing image, and so we have entered a cycle where companies that benefit from our current image reinforce the image, and therefore benefit more, and therefore have more leverage to continue the cycle. There is simply no immediate money in competing views. This analysis seems quite pessimistic, but I think that is another aspect of what has changed. While commercial interest have always had a part in creating our image of the future, I can think of nothing in the modern day that takes the role of the first few generations of science fiction in portraying visionary possible(or impossible) futures. Most of the science fiction I see today is either simple repetition of visions of others, or heavily distopian. Something changed after the era of star-trek so that we seem to no longer view the future of a better, different place, but have become jaded and have lost the belief that a paradigm shift is possible.
P.S. I combined the two responses into 1 double length one because the two articles together address a single idea.