Romeno’s Computer Graphic Replication

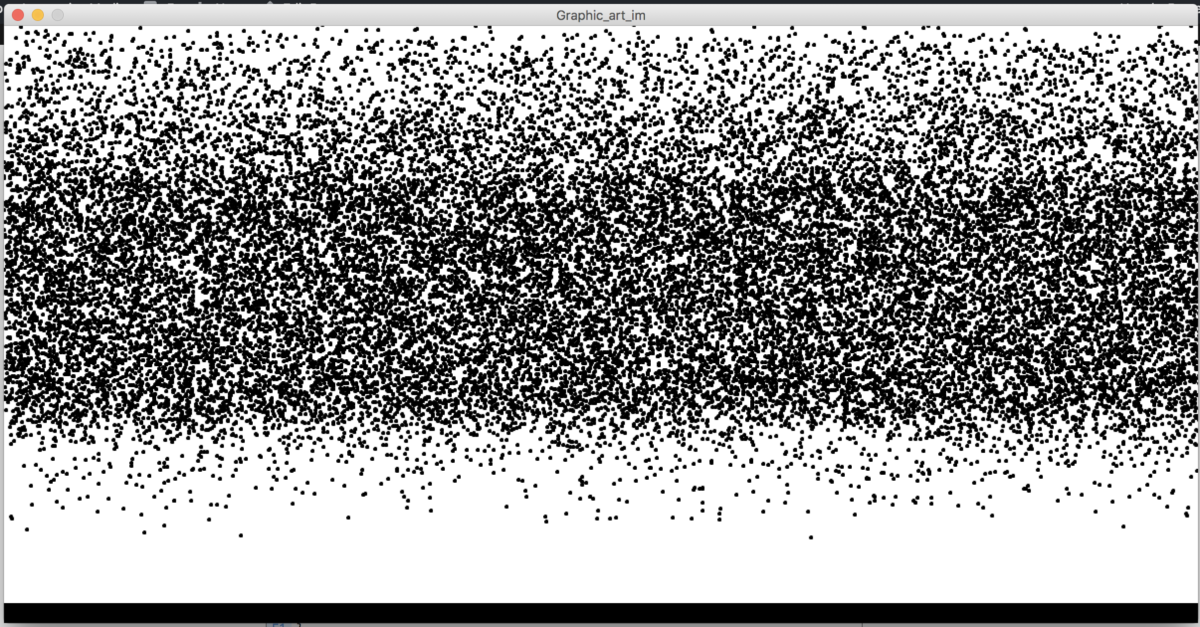
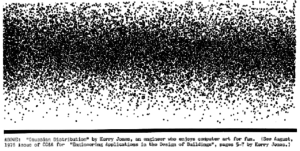
So I started with looking for the easiest graphic to replicate (big mistake) and chose this one:

After starting to recreate it, I realized there were some obstacles to overcome. I needed a way to use probability to place small circles in certain areas of the screen. I started by creating an array with a bunch of 1’s and 0’s and randomly selecting an item from the array and varying the probability by changing the ratio of the 1’s to 0’s in the array. As I kept going, this seemed repetitive so I thought why not make a function that does just this and returns a boolean value of true or false based on a float argument which represents the probability. I made the probability function which is in my code below. I also realized that when I did it the changes in probability were seen as clear cut lines in the graphic so I added randomly from -20 to +20 to all the y-values for some extra randomness.


boolean randomProbability(float prob) {
  int outOfHundred=int(prob*1000);
 int vals[]=new int[1000];
 for (int x=0;x<1000;x++) {
   if(x<outOfHundred) {
 vals[x]=1;
   } else {
   vals[x]=0;
   }
 }
 int rand=vals[int(random(vals.length))];
 if (rand==0) {
 return false;
 } else {
 return true;
 }
 
}

void setup() { size(1200,600);background(255);fill(0);int xSize=1200; int ySize=600;
for(int x=0;x<xSize;x++){
  for(int y=0;y<ySize;y++) {
    float percent=((float(y)/float(ySize)))*100.0;
    int xN=x+int(random(5));
    int yN=y+int(random(-20,20));
    if((percent<3) && (randomProbability(0.003))) {
      ellipse(xN,yN,3,3);
    } 
    if((percent<15)&&(percent>3)&& (randomProbability(0.025))) {
      ellipse(xN,yN,3,3);
    }
        if((percent<25)&&(percent>15)&& (randomProbability(0.045))) {
      ellipse(xN,yN,3,3);
    }
        if((percent<65)&&(percent>25)&& (randomProbability(0.08))) {
      ellipse(xN,yN,3,3);
    }
    if((percent<68)&&(percent>65)&& (randomProbability(0.045))) {
      ellipse(xN,yN,3,3);
    }
    if((percent<75)&&(percent>68)&& (randomProbability(0.01))) {
      ellipse(xN,yN,3,3);
    }
        if((percent<80)&&(percent>75)&& (randomProbability(0.005))) {
      ellipse(xN,yN,3,3);
    }
      if((percent<83)&&(percent>80)&& (randomProbability(0.002))) {
      ellipse(xN,yN,3,3);
    }
  } 
}

rect(0,580,1200,600);
}

void draw() {

}


Romeno’s Self Portrait

I wanted to go for a more interactive self portrait which resulted in me focusing more on the interactivity rather than the visual detail of my face. I used the keyPressed function to trigger the movement of my character using the TAB key, the ‘q’ key for closing/opening my eyes and the ‘w’ key for changing directions of the character’s movement. I added a background image of our campus and used an image for my hair.

The code is pasted below:

int faceWidth=200;//150
int faceHeight=200;
int faceCenterX=0;
int faceCenterY=220;
boolean moveFront=true;
int moveFrontVal=5;
boolean eyesOpen=true;
//int pos=0;
int pos=0;
int mouseXPrev=0;
float[] colors=new float[]{random(255),random(255),random(255)};
int sWidth=1000;
int sHeight=600;
int ground=600;
boolean light=true;
PImage bg;
PImage hair;
int changeDirFace=0;
int opacity=0;
int maxY=faceCenterY;
boolean stayStill=true;
void setup() {
size(1000,600);
bg = loadImage("nyu.jpg");
bg.resize(1000, 600);
rotate(PI/6);
hair = loadImage("hair.png");
hair.resize(200,100);
}
void draw() {
  background(bg);
  /*if(light) {
  background(255);
  } else {
  background(0);
  }*/
  fill(0);
  //arc(faceCenterX-40, faceCenterY-((faceHeight/2))-25, 85, 50, PI, 0);
  image(hair, faceCenterX-changeDirFace-95,faceCenterY-130);
  //rect(faceCenterX-70-changeDirFace,faceCenterY-((faceHeight/2))-15,135,40);

fill(192,192,192);
if(moveFront) {
changeDirFace=-10;
} else {
changeDirFace=10;
}
rect(faceCenterX-130,faceCenterY+(faceHeight/2)-10,230,10);
ellipse(faceCenterX-changeDirFace,faceCenterY+100,faceWidth-55,faceHeight);
fill(215,159,102);
stroke(0);
ellipse(faceCenterX-changeDirFace,faceCenterY,faceWidth,faceHeight);
noStroke();
fill(0);
ellipse(faceCenterX-40,faceCenterY-50,50,50);
ellipse(faceCenterX+30,faceCenterY-50,50,50);
if(eyesOpen) {
fill(255);
}
ellipse(faceCenterX-30,faceCenterY-50,20,20);
ellipse(faceCenterX+45,faceCenterY-50,20,20);
fill(0);
//rect(faceCenterX-60,faceCenterY+35,pos,6);
fill(192,192,192);
rect(faceCenterX-130,faceCenterY+(faceHeight/2),230,200);

//rect(faceCenterX-130,faceCenterY+(faceHeight/2),400,35);

fill(colors[0],colors[1],colors[2]);
rect(faceCenterX-100,faceCenterY+(faceHeight/2),170,200);
fill(0);
arc(faceCenterX, faceCenterY+35, 100, 50, 0, PI);
fill(215,159,102);

arc(faceCenterX-changeDirFace, faceCenterY+(faceHeight/2), 85, 50, 0, PI);
if(mouseX!=mouseXPrev) {
if(pos<140) {
pos+=10;
} else {
pos=0;
} 


}
if(stayStill==false) {
faceCenterX+=moveFrontVal;
if((faceCenterX>(sWidth+(faceWidth/2))) && (moveFrontVal==5)) {
faceCenterX=-(faceWidth/2);
}

if((faceCenterX<(0-(faceWidth/2))) && (moveFrontVal==-5)) {
faceCenterX=(sWidth+(faceWidth/2));
}
mouseXPrev=mouseX;


}
if (faceCenterY+280>ground) { //+200
faceCenterY=280;
}

faceCenterY+=2;
}
void keyPressed() {
  if (key==TAB){
stayStill=!stayStill;} 
if (key=='q'){
  eyesOpen= !eyesOpen;
}
if(key=='w'){
  colors[0]=random(255);
colors[1]=random(255);
colors[2]=random(255);
  //eyesOpen= !eyesOpen;
  if(faceCenterY>maxY) {
faceCenterY-=50;
  }
if (moveFront==false) {
moveFrontVal=-5;
} else {
moveFrontVal=5;
}
moveFront=!moveFront;

if(((faceCenterX-100)<mouseX) && (mouseX<(faceCenterX+70))&& ((faceCenterY+(faceHeight/2)+200)<mouseY) && (mouseY<(faceCenterY+(faceHeight/2)))) {
  light= !light;
}
}
}
void mousePressed() {


}


Spin the pointer

My project this week is literally a finger pointer. It is flat and moves 360 degrees and points to a location randomly. Ideally there would be people around in a circle and when I click the reset button it will turn and point randomly to one person.

I made it more appealing by accelerating the rotation from rest to a high speed and made it random by varying the acceleration randomly by changing the delay value.

Here’s a video of it working:

I’ve also attached the code I used:

const int motorPin = 9;


void setup()
{
    pinMode(motorPin, OUTPUT);
  Serial.begin(9600);
  motorAcceleration();
}


void loop()
{
 
}


void motorAcceleration()
{
  int speed;
  int delayTime = random(5,25); 

  for(speed = 0; speed <= 255; speed++)
  {
    analogWrite(motorPin,speed);    
    delay(delayTime);              
  }


  for(speed = 255; speed >= 0; speed--)
  {
    analogWrite(motorPin,speed);    // set the new speed
    delay(delayTime);               // delay between speed steps
  }
  delay(1000);
}


Midterm Project – The Watch That Bends Time

So, I had the inital idea of making a wall clock that detects when a person is looking at it and if the person is, then the clock would function normally but as soon as he/she looks away it would go haywire and start moving around.

This proved to be difficult to implement as it is almost impossible to detect a person looking at the clock with simple sensors and without using some sort of computer vision. Therefore, I turned to the next best thing with the advice from our professor: A wristwatch which detected to tilt movement as you read the watch.

I used a servo coupled with a tilt sensor and some code to make it work.


Here is a video of it working:

Here’s the code I used:

#include <Servo.h> 
 
Servo myClockServo;
int pos = 0;
int lightSensor = A0;
int tiltPin=2;
int maxLight=0;
int reading;
int previous = LOW;
long time = 0;        
long debounce = 50;   
 

void setup() 
{ 
  pinMode(tiltPin,INPUT);
  digitalWrite(tiltPin,HIGH);
  myClockServo.attach(9);
  Serial.begin(9600);
} 

void loop() 
{ 
  boolean crazy=false;
  
    int switchstate;
    int inPin=tiltPin;
    reading = digitalRead(inPin);
    if (reading != previous) {
    
    time = millis();
  } 
    
    if ((millis() - time) > debounce) {
     switchstate = reading;
    if (switchstate == HIGH)
      crazy = false;
    else
      crazy = true;
  }
  previous = reading;

 
    int delayVal=10; 

    if(crazy){
      myClockServo.write(101);
      
      
      } else {
        
        myClockServo.write(180);
      delay(500);
      myClockServo.write(0);
      delay(500);
        }                          
    
  
}


The ‘Can’ Band

Please refer to Ivory’s post for full context.

I’ve attached the code for the ‘can’ organ here:

#include <CapacitiveSensor.h>
#define NOTE_B0  31
#define NOTE_C1  33
#define NOTE_CS1 35
#define NOTE_D1  37
#define NOTE_DS1 39
#define NOTE_E1  41
#define NOTE_F1  44
#define NOTE_FS1 46
#define NOTE_G1  49
#define NOTE_GS1 52
#define NOTE_A1  55
#define NOTE_AS1 58
#define NOTE_B1  62
#define NOTE_C2  65
#define NOTE_CS2 69
#define NOTE_D2  73
#define NOTE_DS2 78
#define NOTE_E2  82
#define NOTE_F2  87
#define NOTE_FS2 93
#define NOTE_G2  98
#define NOTE_GS2 104
#define NOTE_A2  110
#define NOTE_AS2 117
#define NOTE_B2  123
#define NOTE_C3  131
#define NOTE_CS3 139
#define NOTE_D3  147
#define NOTE_DS3 156
#define NOTE_E3  165
#define NOTE_F3  175
#define NOTE_FS3 185
#define NOTE_G3  196
#define NOTE_GS3 208
#define NOTE_A3  220
#define NOTE_AS3 233
#define NOTE_B3  247
#define NOTE_C4  262
#define NOTE_CS4 277
#define NOTE_D4  294
#define NOTE_DS4 311
#define NOTE_E4  330
#define NOTE_F4  349
#define NOTE_FS4 370
#define NOTE_G4  392
#define NOTE_GS4 415
#define NOTE_A4  440
#define NOTE_AS4 466
#define NOTE_B4  494
#define NOTE_C5  523
#define NOTE_CS5 554
#define NOTE_D5  587
#define NOTE_DS5 622
#define NOTE_E5  659
#define NOTE_F5  698
#define NOTE_FS5 740
#define NOTE_G5  784
#define NOTE_GS5 831
#define NOTE_A5  880
#define NOTE_AS5 932
#define NOTE_B5  988
#define NOTE_C6  1047
#define NOTE_CS6 1109
#define NOTE_D6  1175
#define NOTE_DS6 1245
#define NOTE_E6  1319
#define NOTE_F6  1397
#define NOTE_FS6 1480
#define NOTE_G6  1568
#define NOTE_GS6 1661
#define NOTE_A6  1760
#define NOTE_AS6 1865
#define NOTE_B6  1976
#define NOTE_C7  2093
#define NOTE_CS7 2217
#define NOTE_D7  2349
#define NOTE_DS7 2489
#define NOTE_E7  2637
#define NOTE_F7  2794
#define NOTE_FS7 2960
#define NOTE_G7  3136
#define NOTE_GS7 3322
#define NOTE_A7  3520
#define NOTE_AS7 3729
#define NOTE_B7  3951
#define NOTE_C8  4186
#define NOTE_CS8 4435
#define NOTE_D8  4699
#define NOTE_DS8 4978

long sensor2start,sensor1start,sensor3start,sensor4start;
int melody[] = {
  NOTE_C4, NOTE_G3, NOTE_G3, NOTE_A3, NOTE_G3, 0, NOTE_B3, NOTE_C4
};

// note durations: 4 = quarter note, 8 = eighth note, etc.:
int noteDurations[] = {
  4, 8, 8, 4, 4, 4, 4, 4
};
CapacitiveSensor   can1 = CapacitiveSensor(4,12); // 1M resistor between pins 4 & 8, pin 8 is sensor pin, add a wire and or foil
CapacitiveSensor   can2 = CapacitiveSensor(3,11);
CapacitiveSensor   can3 = CapacitiveSensor(2,10);
CapacitiveSensor   can4 = CapacitiveSensor(5,9);
void setup()                    
{
   can1.set_CS_AutocaL_Millis(0xFFFFFFFF);
   can2.set_CS_AutocaL_Millis(0xFFFFFFFF);
   can3.set_CS_AutocaL_Millis(0xFFFFFFFF);
   can4.set_CS_AutocaL_Millis(0xFFFFFFFF);// turn off autocalibrate on channel 1 - just as an example
   Serial.begin(9600);
   pinMode(7,OUTPUT);
   sensor1start =  can1.capacitiveSensor(50);
   sensor2start =  can2.capacitiveSensor(50);
   sensor3start =  can3.capacitiveSensor(50);
   sensor4start =  can4.capacitiveSensor(50);
   //start
 /*for (int thisNote = 0; thisNote < 8; thisNote++) {

    // to calculate the note duration, take one second divided by the note type.
    //e.g. quarter note = 1000 / 4, eighth note = 1000/8, etc.
    int noteDuration = 1000 / noteDurations[thisNote];
    tone(8, melody[thisNote], noteDuration);

    // to distinguish the notes, set a minimum time between them.
    // the note's duration + 30% seems to work well:
    int pauseBetweenNotes = noteDuration * 1.30;
    delay(pauseBetweenNotes);
    // stop the tone playing:
    noTone(8);
  }*/
   //end
}

void loop()                    
{
 long sensor1 =  can1.capacitiveSensor(50);

    //Serial.println(sensor1);  // print sensor output 
   if(sensor1 >= (sensor1start+500))
   {
    digitalWrite(7,HIGH);
    tone(8, NOTE_A4, 100);
   }
   else{
    digitalWrite(7,LOW);
   }  

   long sensor2 =  can2.capacitiveSensor(50);

    Serial.println(sensor1);  // print sensor output 
   if(sensor2 >= (sensor2start+500))
   {
    digitalWrite(7,HIGH);
    tone(8, NOTE_G4, 100);
   }
   else{
    digitalWrite(7,LOW);
   }  


long sensor3 =  can3.capacitiveSensor(50);

    Serial.println(sensor3);  // print sensor output 
   if(sensor3 >= (sensor3start+500))
   {
    digitalWrite(7,HIGH);
    tone(8, NOTE_B4, 100);
   }
   else{
    digitalWrite(7,LOW);
   }  
   
long sensor4 =  can4.capacitiveSensor(30);

    Serial.println(sensor4);  // print sensor output 
   if(sensor4 >= (sensor4start+500))
   {
    digitalWrite(7,HIGH);
    tone(8, NOTE_E4, 100);
   }
   else{
    digitalWrite(7,LOW);
   }  

   
}


Romeno’s Response To A Brief Rant on the Future of Interaction Design

To me, A Brief Rant on the Future of Interaction Design, changed my perception on the future of handheld devices. I myself had the vision of the, “Pictures Under Glass” as the future of technology.

As the author analyzed everyday objects that we use and emphasized on how we overlook the complexities in them, I was surprised with my ignorance. I since then have been observing everyday actions meticulously and realized really how complex they are.

Even though I learned a lot about the perception of people’s idea of the future of technology, the author hasn’t given a solution or a alternative way to manipulate technology other than using our fingers . The author does respond to this question by saying it is simply a rant. However, he himself said that he “…had the opportunity to design with real working prototypes…” so this would not simply  be a rant as he understands the problem and one would expect him to find a solution or at least suggest one in the article.

The Art Of Interactive Design

The chapter was a very interesting read. I liked how the writer analyzes interactivity by understanding how we ourselves speak. The writer classifies our speech to listening, thinking, and speaking. Where speaking is where the interactivity will take place (and a bit of listening too)

I am more into the backend and how the system works with algorithms and coding rather than a designer of the front-end so this was an interesting read for me as the front-end is a very important part of every product and I need to improve my, “Interactive designing” skills. Let me end my post with a quote from Steve Jobs:

“Design is not just what it looks like and feels like. Design is how it works.”

Light Organ

So I wanted to make use of the dusty LCD Display that we had in our kits, I searched for some tutorials on how to connect it, and did a simple hello world.

The next day, I started tapping on my desk to a beat, and felt like I wanted to make a “beat boxing machine”. But, I didn’t have a proximity sensor to detect movements and I didn’t want to use buttons as that seemed counterintuitive. What I did find in our kit though, was a photo resistor. I figured if I could connect it and detect when the light intensity is low(when you wave ur hand over the resistor) I could set up some arbitrary values and make the buzzer make some sounds.

It was relatively straightforward setting up the breadboard with all the components with the help of the tutorials. I learned that we need a potentiometer for an LCD to adjust the brightness so that it can be made visible in any light environment.

I found a function on the sparkfun website that converts frequencies into keys so I could actually play organ keys on the buzzer which was really cool. I also used code from the sparkfun examples to detect the light intensity from the photo resistor.

https://learn.sparkfun.com/tutorials/sik-experiment-guide-for-arduino—v32/experiment-11-using-a-piezo-buzzer 

https://learn.sparkfun.com/tutorials/sik-experiment-guide-for-arduino—v32/experiment-6-reading-a-photoresistor

I initially started with a system where I had to manually check the maximum light intensity and then manually enter it as the, ‘startVal’ variable. Then every decrease by 5 units from the startVal frequency would result in a different note being played in the buzzer. Later I improved the function so it keeps detecting the light intensity and updating a, ‘high’ variable so I knew the max intensity without the need of manually entering it. So now it had auto calibration.

Here’s a video of how it worked (I used my phone to bring it closer and further from the photo resistor to vary the light intensity):

I’ve also attached the code here:

#include <LiquidCrystal.h>

const int jumpVal=5;


const int sensorPin = 0;
const int buzzerPin = 9;
const int rs = 12, en = 11, d4 = 5, d5 = 4, d6 = 3, d7 = 2;
int lightLevel, high = 0, low = 1023;

const int songLength = 1;
int starterVal;

char notes[] = "c";//dfda ag cdfdg gf "; 

int beats[] = {1,1,1,1,1,1,4,4,2,1,1,1,1,1,1,4,4,2};

int tempo = 113;

LiquidCrystal lcd(2,3,4,5,6,7);

void setup() {
 
  lcd.begin(16, 2);
  pinMode(sensorPin, INPUT);
  pinMode(buzzerPin, OUTPUT);
  
 
}

void loop() {

   lightLevel = analogRead(sensorPin);
   manualTune();
   starterVal=map(high, 0, 1023, 0, 255);
   lcd.setCursor(0, 0);
   lcd.print(lightLevel);
   lcd.setCursor(0, 1);
    
    int i,j, duration, prox;
    char noteNames[] = { 'c', 'd', 'e', 'f', 'g', 'a', 'b', 'C' };
    if(lightLevel<(starterVal-(jumpVal))) {
  for (j = 0; j < 8; j++)
  {
    int num=starterVal-(jumpVal*j);
    if (lightLevel<num) {
      notes[0]=noteNames[j-1];
      lcd.clear();
      lcd.setCursor(0, 0);
   lcd.print(lightLevel);
   lcd.setCursor(0, 1);
      lcd.print(noteNames[j-1]);
      
      } 
    }
  for (i = 0; i < songLength; i++) 
  {
    duration = beats[i] * tempo;  

    if (notes[i] == ' ')          
    {
      delay(duration);            
    }
    else                          
    {
      tone(buzzerPin, frequency(notes[i]), duration);
      delay(duration);            
    }
    delay(tempo/5);              
  }
} else {
        lcd.clear();
      lcd.setCursor(0, 0);
   lcd.print(lightLevel);
   delay(100);
        }
 
}

void manualTune()
{
 if (lightLevel < low)
  {
    low = lightLevel;
  }

 
  if (lightLevel > high)
  {
    high = lightLevel;
  }
  lightLevel = map(lightLevel, 0, 1023, 0, 255);
  lightLevel = constrain(lightLevel, 0, 255);

} 

int frequency(char note) 
{
 
  int i;
  const int numNotes = 8;  
  char names[] = { 'c', 'd', 'e', 'f', 'g', 'a', 'b', 'C' };
  int frequencies[] = {262, 294, 330, 349, 392, 440, 494, 523};


  for (i = 0; i < numNotes; i++)  
  {
    if (names[i] == note)        
    {
      return(frequencies[i]);    
    }
  }
  return(0);  
              
}


There are no electrons

I found the excerpt an interesting read and there is definitely a lot one can learn about electricity. The analogies and humorous tone such as questioning why the farmers in Greece would want to rub their sheep with pieces of amber in the first place makes it much more interesting.

The book is targeted towards the younger audience as it creates an atmosphere that would allow children to enjoy the book and this is what the author wants. However, it seems to be targeting the more younger children rather than the preteen/teen age children which I think is not enough to really create an impact in educating the youth about electricity and giving them a better understanding of it.

I’m going to massage your back.

Well, my initial idea was to make a glove trigger so that when you clench your fists, something will switch on. So I just connected the motor that was given in our sparkfun kit to the redboard and switched it on. It wasn’t staying still for the movement, so I put two regiform pieces on the side of it to keep it stable. Switching it on, I then realized what a good massager this was. Playing with it for a while, I changed my idea from an, “Iron Man” type glove trigger to a back massager. This is what my initial prototype looked like:

The hanger would aid in keeping it stable on the chair like this:

I had to find a way to cover the motor so that people don’t get their backs drilled instead of massaged so I did this:

Here’s a video to demonstrate the amount of vibration it makes.

I needed a method to make it switch on when someone lied on their back in the chair so I made this with some foil that connected the wires to the motor:

And now, the final product on the chair: