I really enjoyed the part in the reading when Manovich was talking about how by the end of the 20th century, there was a media evolution which basically garnered a large need to generate new technologies to store, organise and efficiently access media materials. This reminded me a lot of what my other class, Future of Medicine, were discussing in relation to genome sequencing: how there would be such large amounts of data that would be gathered (big data) and though we have the opportunity to do genome sequencing, the problem is to do with the storing of the data as sequencing one person’s genome would take up terabytes. It seems that as society becomes more technologically advanced, so too does the technology to store and organise information.
The part about variability and the generation of many different versions of something reminded me of the computer graphic recreation project that we presented on Monday and I think the projects highlight Manovich’s explanations of the difference between old media and new media well (in the sense that new media creates versions that are automatically assembled by a computer, shown through random and noise functions).
Unlike many others perhaps, I didn’t start off with a particular image that I wanted to recreate. I first resorted to doing some research on the potential functions that I could use that I could incorporate into my recreation that we may not have learned in class yet.
I found a website (http://zenbullets.com/book.php) which is basically a webpage for a book called “GENERATIVE ART: A PRACTICAL GUIDE”. I realised that many of the example projects that the author had created used the noise() function, lots of +=s and drawPoint() functions. I, therefore, started out my project by researching what these pieces of language meant.
I then chose this image to try and recreate.
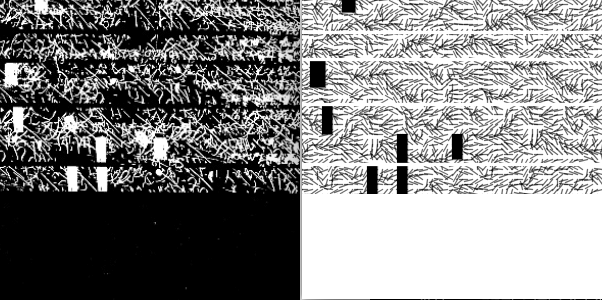
I decided that it was easier for me to start with the random lines and work them out first and then layer the rectangle and lines on top, which would be the easier part. To do the background lines part, I used one of the examples that I followed in the book, but altered it so that it fit what I wanted to do.
I thought that it would be cool if I inverted the colours. The following picture is a side by side comparison of the graphic vs what I recreated.
Though I realise that the lines that I have created still look different to the image, I am happy with the results!
As a development to this recreation though I could work on making those random white splotches that don’t really have any shape to them (as seen in the original graphic). I’m assuming that they’re actually splotches because they look too thick to be the overlaps of the lines.
for (int y = 0; y <= height; y+=5) {
ynoise += 0.5;
xnoise = xstart;
for (int x = 0; x <= width; x+=5) {
xnoise += 0.5;
drawPoint(x, y, noise(xnoise, ynoise));
}
}
fill(0);
rect (95, 165, 10, 30);
rect (65, 165, 10, 30);
rect (95, 135, 10, 30);
rect (20, 105, 10, 30);
rect (8, 60, 15, 28);
rect (150, 135, 10, 25);
rect (40, 0, 13, 13);
stroke (255);
strokeWeight(1);
fill (255);
rect (0, 195, 300, 195);
strokeWeight(3.25);
line (0, 165, 300, 165);
line (0, 105, 300, 105);
line (0, 60, 300, 60);
line (0, 33, 300, 33);
For my self-portrait, I wanted something simple, something that kind of looks like/resembles my Bitmoji character.
The first difference that I wanted to change from my Bitmoji character was the hair length though. Because my hair had grown out, I wanted my self-portrait to resemble this change and so had longer hair. I tried to keep everything relatively similar to my Bitmoji but decided for my portrait to only be just below shoulder length. The result was this:
Okay – very different portraits of me but similar vibes perhaps?
I then decided to incorporate something fancy that we experimented in class and thought that hey! I should change the colour of the shirt that I’m wearing to make the portrait more Harry Potter-esque and to show other people that I do change and wash my clothes. I used the mousereleased function that would change the colour of the shirt to a random colour every time the mouse is released. It’s random because we all need a bit of colour in our lives. Changes in shirt colour could be seen here:
One thing I had to mess around with was the ordering of the different body parts to make sure that one is on top of the other or under another. As well, I had to mess around with the x and y variables to make sure that the face is proportionate. The thing I got most frustrated with though was working with the arc function. The degrees radian part took so much trial and error that I was on the verge of giving up multiple times and wanted to go with a straight line instead – good thing I didn’t though.
I personally really enjoyed reading this article. Though I haven’t made many projects yet, one thing that I realised is that when you ask others to interact or play with your project, something unexpected always happens. For my plant pot project, for example, I originally wanted the plant pot to “smile” when someone talked to it. Adham and Mateo then come along and start swearing at it, should it then be smiling? I then changed the smile to a shocked expression instead because 1) plants would be surprised you’re talking to it 2) it won’t react differently to normal talk and swearing.
One thing Aaron mentioned, which although is different but relates to the article, is the idea of user testing (which is essentially what is described). What I think the article emphasises is the need for user testing to build your project to a certain level of “fixed” rules/expectations and then let whoever is trying out the project experience the rest. I think that it is through this project experience where the person experimenting would evoke the most emotions and thus the person who built it gain the most “satisfaction” out of the making of the project.
What the author describes in his article about not making something because you think others have already done it is exactly my ideology. It is interesting that of all of the themes that are mentioned, there are only a few that I have not thought about either attempting to make or thinking about making in the future. I think that as his list becomes more extensive and the further down you scroll down the page, the concepts behind the ideas become more complicated and you start to see more arbitrary, focused projects where the concept could be applied to a wide variety of projects but the final product is very different.
I think that described phenomenon is the beauty of physical computing or IM, from an already established idea or concept, you could come up with some of the greatest hits.
As this week’s prompt is to use a motor to make a human action/emotion, I decided that I wanted to develop on my plant pot project that I had for the midterm.
Because my project then was already essentially anthromorphosising the plant pot into having human characteristics – the raising of the brows and/or the frowning of them – I wanted to develop something that would make it even more human.
Human/Robotic Legs – DISASTER STRIKES
I initially stuck two servos together to build a leg (so I had 4 servos) and angled and programmed them so that they could essentially have some sort of movement that allows them to move forward (the code for it I found online and just made some minor adjustments). The legs worked at first and I thought that I had finished with the assignment but then I realised that two of the servos were burning up. I thought that perhaps it was because I didn’t have a resistor for my servos, but I was questioning this fact because for the previous times that I have used servos, I didn’t use resistors and they worked fine. I decided to scratch this idea and work on something else that perhaps could be more fun and less disastrous.
Spinning “Talk to Me” Sign – not humanistic but used a form of motor
I wanted to stick to my project from last time and develop it, but the only other human characteristics I could think of was something physical/more action-based. Last time’s project was humanistic in the sense that it was an emotion. However, I could only think of either legs, arms, mouths or ears and because the legs didn’t work out, and I thought that the arms would basically resemble Yoon Hee’s project, and the ears and mouths would basically be the same thing as the eyebrows I made. I, therefore, decided to move away from making something that resembled some sort of human characteristic (essentially what I made last week) to making something really stupid (perhaps an addition to my stupid pet-trick).
I wanted to make a sign that would say “Talk to Me” when the sound detector doesn’t detect any sound and would not say anything when the sound detector detects sound.
I didn’t know how to do the above and so I settled on just having a sign that would rotate with the servo and would spin when there wasn’t a sound detected and would stop the spinning if a sound was detected.
The code for this project was developed from my project from last time where I added another servo:
I wanted the sign to spin faster but I didn’t know how to programme and write the code so that it would do so. I changed the angles, tried to use the for() function but nothing would work out so I kept it as Servo3.write(angle++) which just essentially made it spin very slowly.
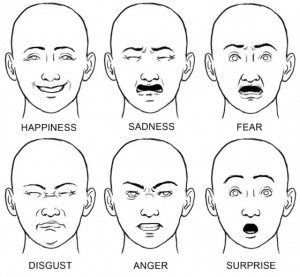
Since I really enjoy using servos (I like them more than LEDs), I wanted to create a stupid pet trip that would at least use more than one of them. I originally just wanted to have a LDR that would basically take into the account the light levels that the plant was getting and if there weren’t enough sunlight, the servo, acting as the eyebrows of the face on the pot, would point more downwards to depict an angry/sad face – like in the image below.
But then during the class discussion, I found two other alternatives that would be cooler 1) detect the water levels of the plant and then that would trigger the servo to move, 2) anthropomorphosise the plant and have a sound detector/microphone attached that would sense that there is sound next to it so that it’ll be happy when it hears that someone is talking to it.
I started playing around with the soil moisture sensor first because I was most unfamiliar with it. After some confusion with how to connect it, I finally got it to work and tried to actually water the plant so that the soil moisture level would change. Below is a video of the serial monitor that showed the moisture level.
The code for this is shown here:
int val = 0; //value for storing moisture value
int soilPin = A0;//Declare a variable for the soil moisture sensor
int soilPower = 7;//Variable for Soil moisture Power
//Rather than powering the sensor through the 3.3V or 5V pins,
//we’ll use a digital pin to power the sensor. This will
//prevent corrosion of the sensor as it sits in the soil.
void setup()
{
Serial.begin(9600); // open serial over USB
pinMode(soilPower, OUTPUT);//Set D7 as an OUTPUT
digitalWrite(soilPower, LOW);//Set to LOW so no power is flowing through the sensor
}
void loop()
{
Serial.print(“Soil Moisture = “);
//get soil moisture value from the function below and print it
Serial.println(readSoil());
//This 1 second timefrme is used so you can test the sensor and see it change in real-time.
//For in-plant applications, you will want to take readings much less frequently.
delay(1000);//take a reading every second
}
//This is a function used to get the soil moisture content
int readSoil()
{
digitalWrite(soilPower, HIGH);//turn D7 “On”
delay(10);//wait 10 milliseconds
val = analogRead(soilPin);//Read the SIG value form sensor
digitalWrite(soilPower, LOW);//turn D7 “Off”
return val;//send current moisture value
}
After making sure that I knew how to work the soil moisture sensor, I moved on to programming my servos. At this point, I realised that it would be a lot more fun if the servos could react to sound (as in cooler and more different for the final product). I, therefore, decided to move towards using the sound detector sensor. Like the soil moisture sensor, I had to figure out how to connect the wires and where to solder headers and what not.
After making sure that it works, I tried to programme the servos so that they would react to changes in the sound detector. This process took me many many hours because I couldn’t figure out why, even if there were no sound, the sound detector would detect that there is a sound and so the servo would be in a constant movement phase where there would be no time that it was not moving. Using the serial monitor, I realised that it was in a constant loop of “quiet” and “loud”.
Messing around with the code, I realised that I couldn’t tell the servo to move 0, 90, or 180 degrees or it would malfunction, I could only use numbers that were not those 3. I still don’t understand why that is, but my code worked after that. The video for that is shown before.
It was then time for me to make the actual hardware part in order to show what I wanted to do with the eyebrows for the plant pot. After measuring where the servos would be located in the pot, I drilled 2 holes into the side of the pot where they would stick out. I realised that the “head” of the servo was too short to extend to the outside of the pot so I attached two small pieces of some plastic straws to the tip of the servo. After that, I messed around with the angles that the servos should turn in so that the eyebrows would move in the direction that I want them to move in.
Making sure that the angles were okay, I then glued two pieces of popsicle sticks to the straws so that the eyebrows would actually be attached to the servos. I then gave the pot 2 eyes and a mouth.
I put a flat layer of hard styrofoam on top of the servos and placed a real plant on the top so that the fake pot could actually do something in useful terms – have a real plant so that the whole point of the project would work.
I then decided to test the project out. The video of my final project in action is shown below:
And here’s my plant, Mr. Greenie McGreen reacting to Adele’s “Hello” because why not.
So yea, I didn’t end up using the moisture sensor- but at least I know how it works now!
Also, I originally wanted to make it so that the faces would change from a angry/sad face to a happy face but the shocked face worked out better because then it would just recognise that someone was talking to it and if someone were to swear at it *ahem Adham*, it would show a shocked face and not a happy face. So, I guess it worked out!
NOTE: I basically created the base in which you put your plant pot onto, not the plant itself.
Romeno and I initially had trouble coming up with a solid plan for what we should do. We thought of making some woodwind instruments, but we didn’t know how the servo would contribute towards this sort of project. We then decided that we wanted to do something like drumming, where you touch or hit something and it’ll make a noise.
I don’t remember why, but for some reason, we decided to use crocodile clips to clip onto some metal objects. Romeno coded (see his post) so that when touched, the buzzer and LED would light up. We first tried this project by clipping a coin to the crocodile clips and putting it on the servo so that it would spin, kind of like a record player. We wanted to imitate a stick-like object so that it would be like drumsticks but rather than hitting the coin, we kept the aluminium stick stable so that the coin would spin and touch the stick and make the buzzer sound. This is shown in the video below.
After that, we wanted to do something that was cooler and provided more than one sound. So rather than attaching the crocodile clips to the coin and making it spin on the servo, we attached it to a Sprite can so that when we touched the can, it would make the LED light up and the buzzer sound. This is shown in the video below.
We then did the same thing with another can but coded it so that the two cans, when touched, would play a different note (see Romeno’s code). We tried creating more cans that would make notes so that it would kind of resemble a piano, but we couldn’t figure out why when we tried to add another can/note, nothing would work. Therefore, we left it with only two cans/notes.
[UPDATE] We got 4 cans/notes to work/play, yay!!!
We couldn’t figure out what to do with the servo, but we thought that hey since we already have a piano-like instrument, why not make a set of drums to go with it! We attached a long ruler-like object that we found in the junk shelf onto the servo and used a cookie box as the drum kit so that when hit the lid and the bottom of the box, they would make sounds that could potentially resemble the bass drum and the hi-hat. The servo speed can be changed using the potentiometer so the beat could be changed to match the speed that you want to play the “piano” in. The code for that is shown below:
Our homemade instrument kit is now, therefore, complete! Below is a video of it!
‘A Brief Rant on the Future of Interaction Design’
This reading allowed me to learn a new term, “Picture Under Glass”. I think I’ve always taken for granted the technology that was offered to me and so whilst using my phone or my iPad, it didn’t really seem to me that I was “denying my hands what they do best”. After reading his argument, I could see where Victor was coming from – to look at the potential of human capabilities. Although I do think that he has a fair point, I wonder what could be some sort of technology that would be able to achieve that goal and make it interesting at the same time. I guess right now what everyone wants to see are those screens that come out of no-where that acts like a transparent iPad that you always see in movies.
‘‘Responses: A Brief Rant on the Future of Interaction Design’
Victor mentioned that he was interested in tools for creating and understanding and that “deep understanding requires active exploration” but I think that in this day and age, there is a general liking for items (especially electronic devices) to be smaller and easy to use – they are easily accessible. His definition of active exploration is being able to take full advantage of the body and mind but as I hinted at in my previous response (up top), I still question how practical that would be.
When Aaron was talking about some example projects that could be made to fit this week’s assignment task, I was very puzzled. I kept trying to think of ideas that are original and creative at the same time. I wracked my brain and couldn’t think of anything. I resorted to talking to one of my close friends about not being able to think of any ideas and her reply to my frustration was to “do something that you know how to do best”. Therefore, this project contains some elements that I know how to do well – no, unlike the what the title suggests, I am not a thief. I, on the other hand, know how to annoy my friends.
I, therefore, wanted to make something that could potentially annoy others (what better way than to do that with noise, am I right?) and have a practical use. Thinking of what I could do with a buzzer and an LED, I thought of making something that would surround an object so that when (let’s say that you have a cat) your cat tries to steal your box of cereal, for example, the shadow of the cat, when close enough, will cause the buzzer to sound and the lights to turn on.
The midway process video is shown below, where I first coded so that the darker the surroundings, the brighter the LED would get. I couldn’t figure out how to make the initial no-shadow/darkness situation be that so the LED was turned off. It was only after that I realised an extra section of calibration was required – which I implemented into the code (link below).
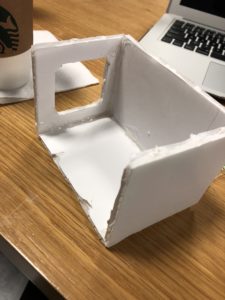
I originally wanted to put the Arduino and breadboard into a box so that it looks more “discrete” in practical terms and so made this box. I didn’t end up using it though because I couldn’t manage to control the LED light levels (even with calibration) and make it stay off initially and only turn on when a shadow “approaches” the object. I realise now that I’m writing this that I could put the photoresistor on the outside of the box so that it sticks out like I originally wanted the LED to do. Nevertheless, I didn’t end up using the box. I guess one good thing about not using the box is that I got to see my code work “properly” in the sense that originally, it was quite hard to see the changes in the brightness of the LED. Putting it in a box would’ve made it even harder to notice the changes due to the initial brightness being low already. I was able to see that my code was working properly.
Figure 1: The box that I made and didn’t end up using
After the process shown in the video above, I connected the buzzer to the circuit and wrote code that basically said that if the LED was at the brightest, the buzzer would sound on. Meaning that when the cat/person was closest to the object (in this case, the board) the lights would turn on and the buzzer sound on. I thought that this could potentially be a way for the cat to be scared away.
I didn’t realise how sensitive the photoresistor would be. I ended up having so much fun with my assignment that I’m sure I disturbed the whole lab with my annoying buzzer noise. But hey, like I mentioned before, annoying people is what I know how to do.
Quick sorry to everyone who was in the lab while I was playing around with the code and then further messing and fooling around with shadow!
Improvements:
Use more LEDs so that there is more scare effect
Blinking LEDs so that it looks more like an alarm?
Change the buzzer into a speaker and play some really annoying alarm sounds that would annoy all humans and animals
Make the whole thief preventer more discrete so that the thief would not expect an alarm to sound and lights to light up – i.e. incorporate the box into the project and make it a lot more practical (though the USB would still need to be plugged into my computer so I’m not sure how it’ll work).