
The new and improved blowback machine, now with twice the interactivity!!!
So initially with the first blowback machine, I had a problem that you needed to blow on it very hard in order to keep the aluminum foil sheets in contact long enough for the fan DC motor to turn on. To fix that, I separated the switch circuit and the motor circuit, and used the Arduino to signal the motor to turn on for 2 seconds as soon as contact between the sheets is made. In addition, I wired the motor properly with a separate power source going through a transistor in order to prevent possible damage to the Arduino.
Now the Interactivity!!
So initially, I wanted add speakers to the circuit that plays the sound of blowing air when the DC motor turns on. So I did some research, and found out that the most convenient way would have been with an Arduino shield that has space for an SD card. I didn’t have that, but I found another way to play sound through Pulse Width Modulation (PWM), the same technology that allows you to dim an LED. So I got to testing 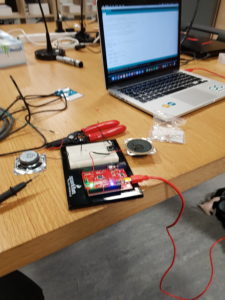 I ran into a few problems. PWM is extremely limiting, as in it could only play 8-bit sounds, therefore I couldn’t have played the sound of blowing. Which I could’ve worked through, if it actually worked. I tried multiple speakers and multiple wiring set ups, but I could not get it to work. So I moved on.
Then I thought, what if people wanted to practice blowing at things, without the consequences of having the rage of the fan! So I added a button to enable or disable fan responsiveness, with an LED to indicate if the fan is going to blow back or not in response to you blowing.
code :
int motorPin = 7;
int circuitPin = 2;
int buttonPin = 8;
int ledPin = 13;
bool fanOperation = false;
bool previousButtonState = false;

void setup() {
  // put your setup code here, to run once:
  pinMode(motorPin, OUTPUT);
  pinMode(circuitPin, INPUT);
  pinMode(buttonPin, INPUT);
  pinMode(ledPin, OUTPUT);
  Serial.begin(9600);
}


void loop() {
  // put your main code here, to run repeatedly:
  int x = digitalRead(circuitPin);
  bool buttonState = digitalRead(buttonPin);
  Serial.println(fanOperation);
  if (buttonState) {
    if (!previousButtonState) {
      fanOperation = !fanOperation;
    }
  }
  if (fanOperation) {
    digitalWrite(ledPin, HIGH);
    if (x) {
    digitalWrite(motorPin, HIGH);
    delay(2000);
    digitalWrite(motorPin, LOW);
    delay(500);
    }
  } if (!fanOperation){
    digitalWrite(ledPin, LOW);
  }

  previousButtonState = buttonState;
}
Video: