
The idea of my project derived from my strange tissue obsession. The concept was that every-time I would want to reach for the tissue box, it would move further away. I planned to achieve this using a photo sensor. While it moved away it would create a sneezing sound.
I started off with experimenting with the servos. Initially, Aaron told me that a student had done a similar idea and made the object ‘jump’ somehow. I had a difficult time creatively thinking about how to make the tissue box jump through the smaller servos we got in our Red SparkFun boxes. I couldn’t think of any mechanism to make the tissue box jump. Subsequently, I started looking at other servos in the lab and came across the continuous rotating servos, and found wheels that go along with it.
My plan was to put these two wheels alongside the tissue box. After consulting with Aaron about this idea, he said it would be better if I incorporated something within the tissue box, as putting wheels outside the tissue box would make the pet trick appear to obvious. Overall, it would defeat the purpose of a pet trick. I decided to put one wheel inside the tissue box.
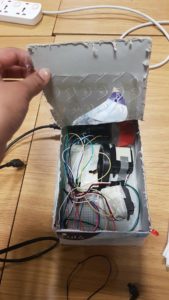
The challenging part about putting one wheel inside was that the weight was unevenly distributed, and the tissue box was elevated slightly, making one side lean towards the ground more than the other. When the tissue box would move, it would curve and not move in a straight line. I added a layer of cardboard to slightly even out the tissue box. If I had more time, I would incorporate small, rubber lego-tires on the bottom of the tissue box so the weight is not unevenly distributed and can move in a linear path rather than a curved one.
One of the most challenging parts of the project was coding the box to move back to its original position. Every time I attempted to create the timer or set the appropriate booleans to activate whether the box moves away/comes back, something went wrong with the code. Aaron really helped me get a better understanding of the logic behind the code. Two really important takeaways from this process was that 1) Instead of trying to write code directly on the application, it’s better to take a piece of paper and understand the logic behind it first, and 2) Always check your code step by step instead of all in one go (which is usually what I do). It only becomes more challenging to debug it that way.
Another challenge was trying to add the sound effect. I used an Arduino Due and Wifi Shield. I looked at various demos online, however one of the necessary import libraries was not working, which wouldn’t allow the audio to work. I tried using other materials from the lab, such as the AUX jack breakout, but there was limited information on how to use them with the combination of materials I had. My last option was to directly connect the speaker to the board, but I had read controversial reviews on how that could be dangerous so I chose not to for the efficiency of the board. I was quite disappointed that I couldn’t use the audio as I felt that it would have added a great touch to the piece. I used an LED as a substitute, signalling a red light every-time one tried to reach for the tissue box as a warning symbol. It wasn’t the best alternative. If I could get a hold of an MP3 shield next time, I would definitely add audio to my project.
*Note: I do plan on adding audio to my project on Monday/Tues (Mar 5/6. 2018), once I am done a couple of other important assignments over the weekend.