The Mateo Dishwasher – Stupid Pet Trick


We’ve had a huge problem in the IM lab of people not washing their dishes. We’ve tried just telling people to wash their dishes but that does not seem to work, so we needed to resort to more creative solutions.

Introducing, the Mateo dishwasher:

It’s the machine that shames people into washing their dishes using Mateo’s angry and shaming voice. You can’t hear this and not reevaluate your life choices that lead you up to this point. However, Mateo is forgiving if you come back to do your dishes:


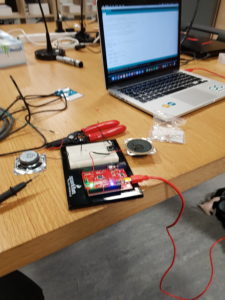
I am using the Adafruit MP3 shield for this and playing the sounds from an SD card, with an external amplifier between the shield and the speaker in order to make the sound louder.

Here’s the code:

// include SPI, MP3 and SD libraries
#include <SPI.h>
#include <Adafruit_VS1053.h>
#include <SD.h>

// These are the pins used for the breakout example
#define BREAKOUT_RESET  9      // VS1053 reset pin (output)
#define BREAKOUT_CS     10     // VS1053 chip select pin (output)
#define BREAKOUT_DCS    8      // VS1053 Data/command select pin (output)
// These are the pins used for the music maker shield
#define SHIELD_RESET  -1      // VS1053 reset pin (unused!)
#define SHIELD_CS     7      // VS1053 chip select pin (output)
#define SHIELD_DCS    6      // VS1053 Data/command select pin (output)

// These are common pins between breakout and shield
#define CARDCS 4     // Card chip select pin
// DREQ should be an Int pin, see http://arduino.cc/en/Reference/attachInterrupt
#define DREQ 3       // VS1053 Data request, ideally an Interrupt pin

Adafruit_VS1053_FilePlayer musicPlayer =
  // create breakout-example object!
  //  Adafruit_VS1053_FilePlayer(BREAKOUT_RESET, BREAKOUT_CS, BREAKOUT_DCS, DREQ, CARDCS);
  // create shield-example object!
  Adafruit_VS1053_FilePlayer(SHIELD_RESET, SHIELD_CS, SHIELD_DCS, DREQ, CARDCS);

int sensorpin = A1;
int currenttime = 0;
int triggertime = 0;

void setup() {
  Serial.begin(9600);
  Serial.println("Adafruit VS1053 Simple Test");

  if (! musicPlayer.begin()) { // initialise the music player
    Serial.println(F("Couldn't find VS1053, do you have the right pins defined?"));
    while (1);
  }
  Serial.println(F("VS1053 found"));

  if (!SD.begin(CARDCS)) {
    Serial.println(F("SD failed, or not present"));
    while (1);  // don't do anything more
  }

  musicPlayer.setVolume(1, 1);

  // If DREQ is on an interrupt pin (on uno, #2 or #3) we can do background
  // audio playing
  musicPlayer.useInterrupt(VS1053_FILEPLAYER_PIN_INT);  // DREQ int
//  musicPlayer.sineTest(0x44, 500);
}
int cutoff = 250;
void loop() {
  currenttime = millis();
  int x = analogRead(sensorpin);
  //  Serial.println(x);
  if (x > cutoff && (currenttime - triggertime) > 2000) {
    musicPlayer.playFullFile("greatjob.mp3");

    //    delay(100);
    if (analogRead(sensorpin) > cutoff) {
      triggertime = millis();
      return;
    } else {
      musicPlayer.playFullFile("heyhey.mp3");
      if (analogRead(sensorpin) > cutoff) {
        musicPlayer.playFullFile("right.mp3");
        triggertime = millis();
        return;
      }
      musicPlayer.playFullFile("comeback.mp3");
      if (analogRead(sensorpin) > cutoff) {
        musicPlayer.playFullFile("right.mp3");
        triggertime = millis();
      } else {
        musicPlayer.playFullFile("insult.mp3");
        triggertime = millis();
        return;
      }
    }
  }
}


Emotion & Design: Attractive things work better

Norman definitely repeated a lot of points in this article from his book. I found what he said about the aesthetics having a positive emotional response rather than a rational response very interesting. Thinking back about the introduction of the iPhone, and the following industry-wide switch from physical keyboards on phones to on-screen keyboards, I’m sure plenty of people including me miss the physical keyboards on the blackberry phones that we had. However, I would never even consider switching back. Today’s screens on phones are gorgeous, and I would not sacrifice such screen estate for a physical keyboard.

The Design of Everyday Things

lately, the word “Design” has become a buzzword that is thrown around everywhere to the point that it almost lost its meaning. All companies are integrating ‘Design’ into their products, all the labs are renaming themselves to ’something Design lab’, etc etc. So it was refreshing to read about design from one of the pioneers of the field of the field of design in general and Human-Centered Design in specific, Don Norman A.K.A The Design Don himself. The Design of Everyday Things is widely considered to be one of the fundamental books on design.
I specifically like what he was saying about Experience Design, because it is an aspect of design that I notice is often overlooked. One example of experience design that comes to mind is the BMW i8. It is a hybrid car, having both an electric and a small gasoline engine, and it is incredibly quiet. It is absolutely a feat of engineering to have a supercar that is this quiet. However, BMW realized that the roaring sound of an engine is an important part of the experience of owning a supercar and decided to feed artificial engine sound through the speaker.
All that being said, there is a problem with The Don’s approach of Human-Centered Design. HCD doesn’t allow much room for technological innovation. It is a design process that improves current technologies in a way that the user wants. However sometimes, as Steve Jobs would say, the user does not know what he wants. If Jobs followed the HCD approach to design, the iPhone would not be the way it is today. We may still have had physical keyboards on phones! Whether that’s a good or bad thing is up for debate.
P.S. Here’s a good video about the ’Norman doors’ discussed in the reading: https://www.youtube.com/watch?v=yY96hTb8WgI

Measuring brightness

Our eyes are unreliable. If you’re anything like me, you’re always frustrated at how our eyes don’t measure brightness linearly. No? Just Me? Sunlight is on average 20 times as bright as indoor lighting and we definitely don’t notice that much of a difference. Anyways, moving on, I wanted to make something that will measure the brightness and give an easy visual indicator to the brightness level currently in the room (and won’t lie to us like our eyes do). So I did this:

The values read from the Light Dependent Resistor are from 0-1024, so what I did is divide the reading by a 100, and store that number in an int variable. What this did is that it extracted the most significant (leftmost) digit of the reading ex: extracts the 7 out of 721. Then, in a for loop, I would set the pins from 0 to the extracted number to high, which resulted in what was shown in the video.

code:

int beginPin = 2;
int endPin = 11;
int sensorPin = A0;

void setup() {
  // put your setup code here, to run once:
  // for loop to set all the pins to output so I don't have to do it manually
    for (int i = beginPin; i <= endPin; i++) {
      pinMode(i, OUTPUT);
    }
    Serial.begin(9600);
}

void loop() {
  // put your main code here, to run repeatedly:
   int sensorReading = analogRead(sensorPin);
   // extracts the leftmost digit of a 3 digit number
   int leds = sensorReading/100;
   Serial.print(sensorReading);
   Serial.print("||");
   Serial.println(leds);
   // for loop to turn off all the leds before setting the relevant ones to high
   for (int i = beginPin; i <= endPin; i++){
    digitalWrite(i,LOW);
   }
   for (int i = beginPin; i < (beginPin+leds); i++){
    digitalWrite(i, HIGH);
   }
}

Oh also as an added bonus, it can also display the brightness as an 8-bit binary number (0-255)

code for the binary display:

int beginPin = 2;
int endPin = 11;
int sensorPin = A0;

void setup() {
  // put your setup code here, to run once:
  for (int i = beginPin; i <= endPin; i++) {
    pinMode(i, OUTPUT);
  }
  Serial.begin(9600);
}

void loop() {
  // put your main code here, to run repeatedly:
  int sensorReading = analogRead(sensorPin);
  byte x = map(sensorReading, 0, 1024, 0, 255);
  Serial.print(x);
  Serial.print(" : ");
  for (int i = 0; i < 8; i++) {
    digitalWrite(i + beginPin, bitRead(x, i));
    Serial.print(bitRead(x, i));
  }
  Serial.println();
}

keep in mind that on the serial monitor this will print the binary number in reverse.

the Blowback Machine (New, Improved, and Interactive!)

The new and improved blowback machine, now with twice the interactivity!!!

So initially with the first blowback machine, I had a problem that you needed to blow on it very hard in order to keep the aluminum foil sheets in contact long enough for the fan DC motor to turn on. To fix that, I separated the switch circuit and the motor circuit, and used the Arduino to signal the motor to turn on for 2 seconds as soon as contact between the sheets is made. In addition, I wired the motor properly with a separate power source going through a transistor in order to prevent possible damage to the Arduino.

Now the Interactivity!!


So initially, I wanted add speakers to the circuit that plays the sound of blowing air when the DC motor turns on. So I did some research, and found out that the most convenient way would have been with an Arduino shield that has space for an SD card. I didn’t have that, but I found another way to play sound through Pulse Width Modulation (PWM), the same technology that allows you to dim an LED. So I got to testing I ran into a few problems. PWM is extremely limiting, as in it could only play 8-bit sounds, therefore I couldn’t have played the sound of blowing. Which I could’ve worked through, if it actually worked. I tried multiple speakers and multiple wiring set ups, but I could not get it to work. So I moved on.

Then I thought, what if people wanted to practice blowing at things, without the consequences of having the rage of the fan! So I added a button to enable or disable fan responsiveness, with an LED to indicate if the fan is going to blow back or not in response to you blowing.

code :

int motorPin = 7;
int circuitPin = 2;
int buttonPin = 8;
int ledPin = 13;
bool fanOperation = false;
bool previousButtonState = false;

void setup() {
  // put your setup code here, to run once:
  pinMode(motorPin, OUTPUT);
  pinMode(circuitPin, INPUT);
  pinMode(buttonPin, INPUT);
  pinMode(ledPin, OUTPUT);
  Serial.begin(9600);
}


void loop() {
  // put your main code here, to run repeatedly:
  int x = digitalRead(circuitPin);
  bool buttonState = digitalRead(buttonPin);
  Serial.println(fanOperation);
  if (buttonState) {
    if (!previousButtonState) {
      fanOperation = !fanOperation;
    } 
  }
  if (fanOperation) {
    digitalWrite(ledPin, HIGH);
    if (x) {
    digitalWrite(motorPin, HIGH);
    delay(2000);
    digitalWrite(motorPin, LOW);
    delay(500);
    } 
  } if (!fanOperation){
    digitalWrite(ledPin, LOW);
  }
  
  previousButtonState = buttonState;
}

Video:

The Jump to Universality

I thought this reading is incredibly interesting and thought provoking. It also made me realize the existence of these little ‘glitches in the matrix’, where things are happening out of the time that you would typically associate with them. Let me explain. For example, the system that the romans developed for the adding up their numerals, is exactly an algorithm that we would feed today’s computers. As another example, Alan Turing while developing the mathematical framework of general purpose computers, also developed Turing machines, which are theoretical general purpose computers that compute everything using the Unary system which is a very similar system to what the pre-historic farmers mentioned in the text used. Another thing I noticed throughout the reading is that the Author is desperate for the mathematicians and people he wrote about to make the jump to universality. I would argue that a lot of them didn’t need to, they developed number systems that were suitable for them, and didn’t need a universal number system.

the art of interactive design

The author mentioned that big intricate topics like interactivity can’t be boiled down to a simple definition, and I fully agree with that statement. I found the definition he set lacking but then again so are most definitions for complicated topics. One thing I would disagree with him on though, is him dismissing the fridge opening as interactivity. It is indeed interactivity, albeit weak interactivity, as it fits everything he described earlier in the reading and he admits that, but then he dismisses it anyways. Also I really liked what he said about participation not being interactivity, the concepts didn’t have a clear distinction in my head, but he does a good job of explaining them. Lastly, regarding what the author mentioned about movies not being interactive, interactive movies actually exist now! Like the movie In Limbo https://inlimbo.tv/en/

The Blowback Machine!

Our assignment was to create a switch that doesn’t require the use of hands, and one that doesn’t use any programming. So I started off brainstorming different ways of interacting with the switch, and then afterwards what kind of outputs I can get and use.

Brainstorming

Eventually I settled on the idea of blowing as the input, and the use of a motor as the output. I started testing out different ways and materials that I can use to complete a switch with just blowing air. Whatever I used needed to meet 2 criteria:

  1. It had to be conductive
  2. It had to be elastic, as in it had to move when blown on, but return to place when the blowing stops.

After some trial and error with wooden sticks and aluminum foil, I decided on this:

the input

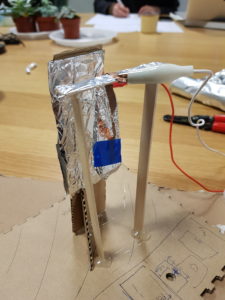
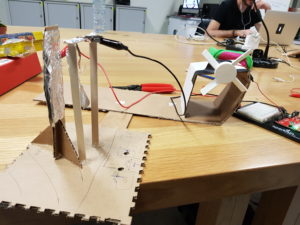
You blow on the hanging piece of cardboard wrapped in foil, and it’ll make contact with the stationary piece of cardboard wrapped in foil. In order to not make the hanging piece of cardboard hefty, the current is transferred through copper tape to the top wooden stick, also wrapped in foil, where the alligator clips connects this piece to the rest of the circuit.

As for the output, I scoured the IM lab for parts and found an already 3D printed fan that attaches to the DC motor. So I came up with the idea of the blowback machine! You blow to activate it and it blows back at you. Here is the final product:

And the circuit diagram:

Scanned_20180128-1438

There are no electrons

When I started reading the book, I got excited by the concept of it. I spent years upon years reading maths, physics, and chemistry textbooks and more often than not they are incredibly confusing for someone who is not very familiar with the topics explained. If I had read “x is left as an exercise for the reader” one more time, I would’ve quit STEM altogether. However I found these series of books by this company, CGP, that did a great job at explaining complicated concepts in an approachable and fun way. I thought this book was going to be similar to that, however it wasn’t. Amdahl does a poor job at explaining the concepts in my opinion, and the book is riddled with fillers. He spent 4 pages setting up the greenie analogy which were entirely fillers! What I’m trying to say is, I can see why this book was rejected by 89 publishers. After a certain amount of “no”s, the world is not wrong, you are.