
I found this text interesting but also quite challenging to read. There were many definitions and concepts I had to keep searching up, I felt that there was a lack of context for a general reader’s understanding. An idea that I found to be profound was how modern media was described. The author explained that it had discrete levels because it emerged during the Industrial revolution, and how modern media evidently follows the factory logic. I really liked the connection between social changes in the 19th century and art. The claim “to understand the logic of new media we need to turn to computer science” allowed for a greater appreciation for the work I am doing in the Intro to IM class.
Author: Lubnah Ansari
Self Portrait Project
I wanted to create something aesthetically appealing and minimalist with my self-portrait. When Aaron mentioned this project, I thought of the illustration I make every time I create cards/letters:
I wanted to create something along these lines, but not the same illustration with the flowers on my eyes. I wanted to incorporate my glasses, as I believe that is an essential part of my outer appearance. I wanted to create the same style of my hand-illustrated face, which has minimalist shapes to demonstrate complex parts of my face, such as the simple curves that represent my cupid-shaped lips. Hence, I used the line and arc tool plenty of times. Figuring out a minimalist shape for my nose and mouth was much harder to think of digitally than it is when I hand illustrate it. I wanted my lips to be shaped differently, something distinct from the stereotypical happy/neutral emotion. The arc tool was incredibly difficult to use, but it was a satisfying challenge.
I wanted to make the project interactive. A way I thought of doing this was having a bubble gum expand from my mouth once it is clicked. Once it fills the screen, it would pop and return back to its normal size. This was incredibly difficult to code. Although I got the bubble to expand once it was clicked on, I was not able to make the bubble return back to its normal size. Because I was coming back late from break, I suspected I wouldn’t have enough time to fix the issue, so I decided to go ahead with an non-interactive design. I wanted to show the bubble gum code on this post, however my laptop got re-imaged and I lost the code as I didn’t back it up.
It was also extremely difficult to create hair. I wanted to illustrate long hair in strands (as seen on my hand illustration), but wasn’t sure how to go about it. Hence, I decided to go for the high-bun look and have a bandana, as simply an ellipse shape on top of my head did not look natural.
I also found it interesting that the lines and arcs in Processing are not vector-images. They have a colored background, for instance the arc had a white rectangular background. I am not sure how effective that is when creating an art project, but it was nonetheless an interesting discovery. I wonder why it isn’t a vector image.
I actually really enjoyed using Processing to create artwork. This was my favorite project yet this semester.
Code for my project:
void setup(){
  size(480,640);
  frameRate(5);
}

float radius;

void draw(){
  background(0, 0, 0);

  fill(0);
  stroke(255);
  ellipse(240,325,730,800);
  stroke(255);
  ellipse(240,325,630,700);
  stroke(255);
  ellipse(240,325,530,600);
  stroke(255);
  ellipse(240,325,430,500);
  stroke(255);
  ellipse(240,325,330,400);
  stroke(255);
  ellipse(240,325,230,300);


  fill(255);
  stroke(0);
  ellipse(240,200, 150, 190);

  fill(255);
  ellipse(115,350, 50, 80);

  fill(255);
  ellipse(365,350, 50, 80);

  fill(0);
  ellipse(100,370,5,5);

  fill(0);
  ellipse(100,370,5,5);

  fill(0);
  ellipse(379,370,5,5);


  fill(random(0, 204), random(0, 255), random(0, 255));
  ellipse(240,330,275,350); //x,y,w,h


  fill(255);
  ellipse(240,360,275,350); //x,y,w,h
  fill(random(0, 255), random(0, 255), random(0, 255));
  ellipse(300,340,75,75); //glasses 1
  fill(random(0, 255), random(0, 255), random(0, 255));
  ellipse(180,340,75,75); //glasses 2
  line(216, 340, 264, 340); //middle portion of glasses
  line(104, 340, 141, 340); //side portion of glasses
  line(336, 340, 375, 340); //side portion of glasses

fill(255);
stroke(0);
arc(240, 410, 50, 35, PI, PI+QUARTER_PI);
arc(225, 410, 20, 20, HALF_PI, PI);

arc(270, 450, 170, 50, HALF_PI, PI);
arc(170, 440, 50, 35, PI, PI+QUARTER_PI);

arc(260, 485, 100, 10, HALF_PI, PI);
arc(260, 470, 50, 30, PI+QUARTER_PI, TWO_PI);
arc(210, 460, 60, 30, PI+QUARTER_PI, TWO_PI);

fill(0);
ellipse(225, 410, 3, 3);

//fill(0);
//stroke(255);
//ellipse(240,150,115,130);

stroke(0);
line(257, 410, 255, 380);

}
Recreating Computer Graphics
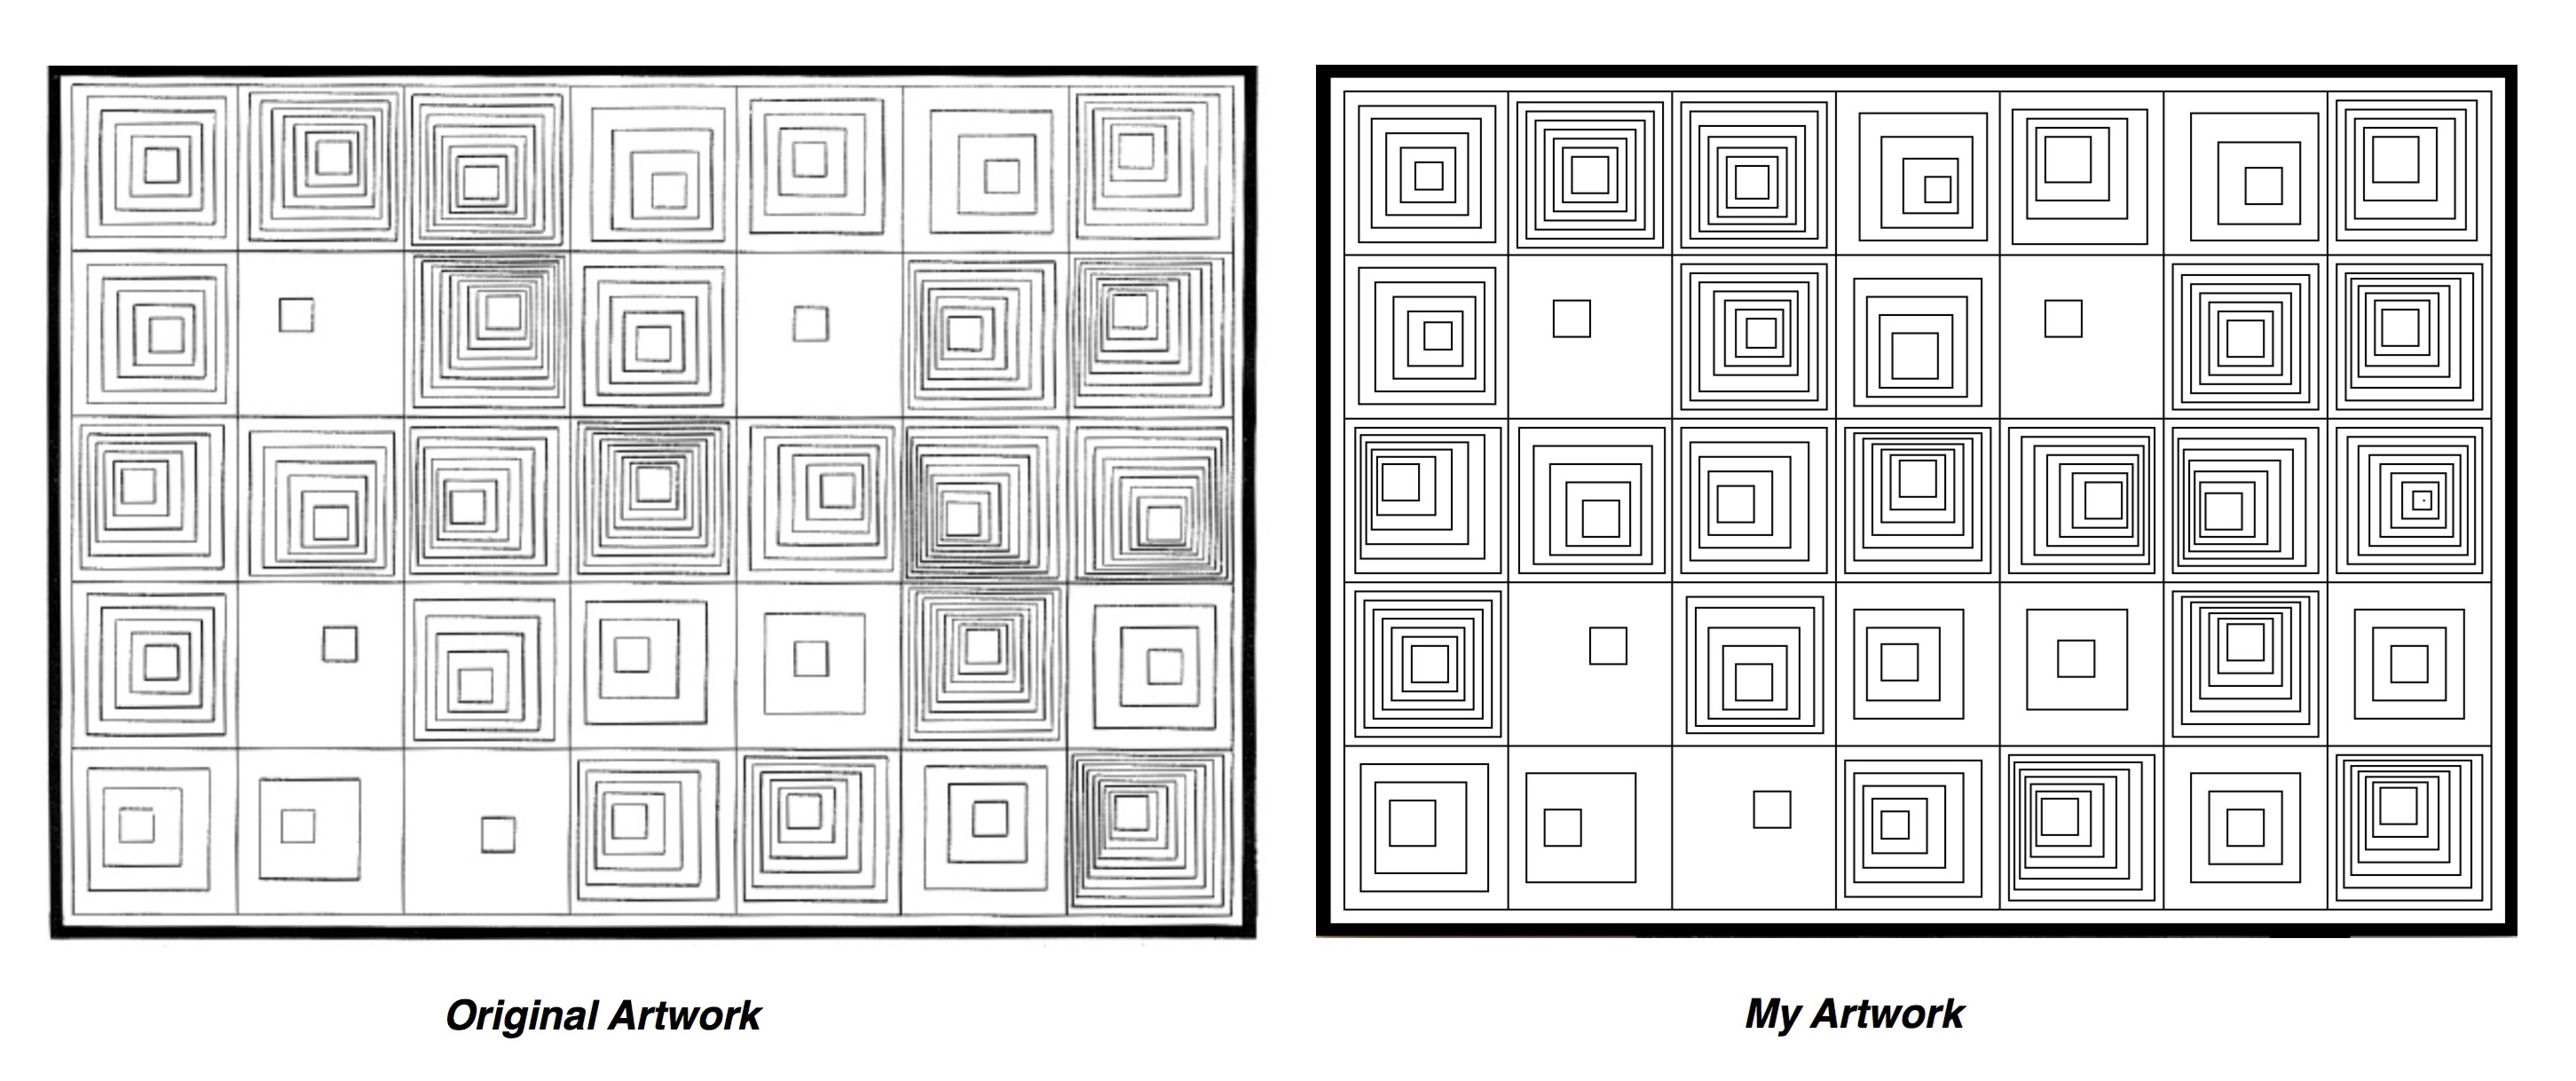
I chose to replicate this artwork because the particular pattern and organisation of the shapes provided some sort of comfort to me. I liked the aesthetic appeal of the repetition of squares. I initially set up the grid and border by using the line (for border) and rectangle (for grid) tool.
The challenge was that each square on the grid has its own pattern. In total, there were 35 different styles I had to account for. I decided that the most efficient way to code would be to create a for-loop for each square. This was the for-loop I decided to use for square #1 in the first row:
for (int i=0; i<6; i++){
  rect((21+7i),(200+5i),(80-12i),(80-12i));
However, the for loop didn’t work. I later asked Aaron what the problem could be. He told me that I couldn’t multiply ‘i’ with a number by placing it next to a variable, I had to use the ‘*’ sign. It was a small error, but because I couldn’t figure it out on time I had hard-coded 80% of my project, which resulted in my code being long and inefficient. It was also extremely time consuming, but it also felt quite surprisingly meditative to hard code this project.
I also assumed that the dark values created by some of the rectangles (ex. below) would not be created by the rectangle tool, but the line tool and change in stroke weight. Hence I was skeptical of using the rectangle tool instead of the line tool throughout the process. But I was also afraid to use the line tool because of how incredibly time consuming it would be (in addition to hard-coding). I was surprised to find that the values can be created by the rectangle tool depending on how close the shapes are to each other, which gives the illusion of darker/lighter values.
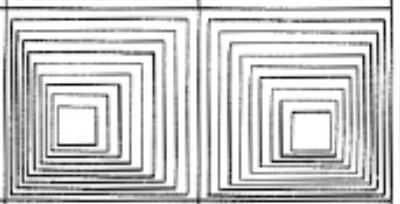
from original artwork
The code for my project:
void setup(){
  size(660,480); //w,h
}

void draw(){
  background(255,255,255);

  //border
  strokeWeight(15);
  line(0,0,660,0);
  line(0,0,0,480);
  line(660,0,660,480);
  line(0,480,660,480);

  //square skeleton 1st row
  strokeWeight(1);
  rect(15,15,90,90);
  rect(105,15,90,90);
  rect(195,15,90,90);
  rect(285,15,90,90);
  rect(375,15,90,90);
  rect(465,15,90,90);
  rect(555,15,90,90);

  //SS 1st column
  rect(15,105,90,90);
  rect(15,195,90,90);
  rect(15,285,90,90);
  rect(15,375,90,90);

  //SS 2nd column
  rect(105,105,90,90);
  rect(105,195,90,90);
  rect(105,285,90,90);
  rect(105,375,90,90);

  //SS 3rd column
  rect(195,105,90,90);
  rect(195,195,90,90);
  rect(195,285,90,90);
  rect(195,375,90,90);

  //SS 4th column
  rect(285,105,90,90);
  rect(285,195,90,90);
  rect(285,285,90,90);
  rect(285,375,90,90);

  //SS 5th column
  rect(375,105,90,90);
  rect(375,195,90,90);
  rect(375,285,90,90);
  rect(375,375,90,90);

  //SS 6th column
  rect(465,105,90,90);
  rect(465,195,90,90);
  rect(465,285,90,90);
  rect(465,375,90,90);

  //SS 7th column
  rect(555,105,90,90);
  rect(555,195,90,90);
  rect(555,285,90,90);
  rect(555,375,90,90);

  //1st square
  noFill();
  rect(23,23,75,75);
  rect(30,30,60,60);
  rect(38,38,45,45);
  rect(46,46,30,30);
  rect(54,54,15,15);

  //1st square 2nd row
  noFill();
  rect(23,112,75,75);
  rect(32,120,60,60);
  rect(42,128,45,45);
  rect(50,136,30,30);
  rect(59,142,15,15);

  //1st square 3rd row
    rect(21,200,80,80);
    rect(24,204,68,68);
    rect(27,208,56,56);
    rect(30,212,44,44);
    rect(33,216,32,32);
    rect(36,220,20,20);

  //1st square,5th row
  rect(24,385,70,70);
  rect(32,395,50,50);
  rect(40,405,25,25);

  //1st square, 4th row
  rect(21,290,80,80);
  rect(26,295,70,70);
  rect(31,300,60,60);
  rect(36,305,50,50);
  rect(41,310,40,40);
  rect(47,315,30,30);
  rect(52,320,20,20);

  //2nd square
  noFill();
  rect(110,21,80,80);
  rect(115,26,70,70);
  rect(120,31,60,60);
  rect(125,36,50,50);
  rect(130,41,40,40);
  rect(135,46,30,30);
  rect(140,51,20,20);
  //rect(145,56,10,10);

  //2nd square 2nd row
  rect(130,130,20,20);

  //2nd square 4th row
  rect(150,310,20,20);

  //2nd square 5th row
  rect(115,390,60,60);
  rect(125,410,20,20);

  //2nd square 3rd row
  rect(111,200,80,80);
  rect(119,210,65,65);
  rect(128,220,50,50);
  rect(137,230,35,35);
  rect(146,240,20,20);

  //3rd square
  noFill();
  rect(200,21,80,80);
  rect(205,26,70,70);
  rect(210,34,58,58);
  rect(215,40,48,48);
  rect(220,46,38,38);
  rect(225,51,28,28);
  rect(230,56,18,18);

  //3rd square 2nd row
  rect(200,110,80,80);
  rect(205,115,70,70);
  rect(210,120,60,60);
  rect(218,125,46,46);
  rect(224,130,36,36);
  rect(230,135,26,26);
  rect(236,140,16,16);

  //3rd square 7th row
  rect(240,400,20,20);

  //3rd square 3rd row
  rect(200,200,80,80);
  rect(205,208,65,65);
  rect(210,216,50,50);
  rect(215,224,35,35);
  rect(220,232,20,20);

  //3rd square, 4th row
  rect(203,293,75,75);
  rect(208,299,65,65);
  rect(215,310,50,50);
  rect(223,320,35,35);
  rect(230,330,20,20);

  //4th square
  noFill();
  rect(298,27,70,70);
  rect(310,40,50,50);
  rect(322,52,30,30);
  rect(334,62,14,14);

  //4th square 2nd row
  //noFill();
  for (int i = 0; i <4; i++){
    rect(295+7*i,118+10*i,70-15*i,70-15*i);
  }

  //4th square 3rd row
  noFill();
  for (int i=0; i<7; i++){
  rect(290+5*i,200+3*i,80-10*i,80-10*i);
  }

  //4th square 4th row
  rect(295,300,60,60);
  rect(302,310,40,40);
  rect(310,319,20,20);

  //4th square 5th row
  for (int i=0; i<5; i++){
  rect(290+5*i,383+7*i,75-15*i,75-15*i);
  }

  //7th square
  noFill();
  rect(560,20,77,77);
  rect(565,25,66,66);
  rect(570,30,55,55);
  rect(575,35,40,40);
  rect(580,40,25,25);

  //7th square 2nd row
  noFill();
  rect(560,110,80,80);
  rect(565,115,70,70);
  rect(568,118,60,60);
  rect(572,122,50,50);
  rect(576,126,40,40);
  rect(581,130,30,30);
  rect(585,135,20,20);

  //7th square 5th row
  rect(570,300,60,60);
  rect(580,310,40,40);
  rect(590,320,20,20);

  //7th square 4th row
  for(int i=0; i<9; i++){
  rect(560+i*6,200+i*5,80-10*i,80-10*i);
  }

  //7th square 7th row
  for(int i=0; i<7; i++){
  rect(560+i*4,380+i*3,80-10*i,80-10*i);
  }

  //6th square
  noFill();
  rect(480,27,70,70);
  rect(495,43,45,45);
  rect(510,57,20,20);

  //6th square 2nd row
  noFill();
  rect(470,110,80,80);
  rect(475,116,70,70);
  rect(480,121,60,60);
  rect(485,126,50,50);
  rect(490,131,40,40);
  rect(495,136,30,30);
  rect(500,141,20,20);

  //6th square 7th row
  rect(480,390,60,60);
  rect(490,400,40,40);
  rect(500,410,20,20);

  //6th square 3rd row
  for(int i=0; i<7;i++){
  rect(470+3*i,200+6*i,80-10*i,80-10*i);
  }

  //6th square 4th row
  for(int i=0; i<7;i++){
    rect(470+5*i,290+3*i,80-10*i,80-10*i);
  }

  //5th square
  rect(382,25,74,74);
  rect(390,30,55,55);
  rect(395,35,40,40);
  rect(400,40,25,25);

  //5th square 2nd row
  rect(400,130,20,20);

  //5th square 4th row
  rect(390,300,55,55);
  rect(407,317,20,20);

  //5th square row 3
for(int i=0; i<7;i++){
    rect(380+7*i,200+5*i,80-10*i,80-10*i);
}

  //5th square row 5
  for(int i=0; i<7;i++){
    rect(380+3*i,380+4*i,80-10*i,80-10*i);
}

}
Motors: Human Movement Project
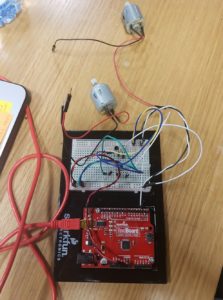
- My plan for the project was to create a spinning ballerina. I tried to wire up two DC motors to the Arduino board, but only one would work successfully. Adham helped me figure out that the Arduino probably doesn’t have enough energy to power two DC motors, so he let me borrow his motor shield.
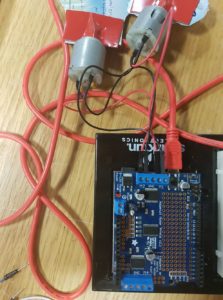
- The motor shield was able to successfully power two DC motors. It was really easy and straightforward to work with it.

- When I used plain paper and stuck them on the DC motor, they would be too flimsy and easily fly off. Instead, I pasted an A4 image of a ballerina on the back and front side of the tissue-box cardboard material as opposed to normal cardboard, which was too thick. I used electrical tape so the cardboard wouldn’t fly off as the DC motors are quite powerful. I lowered down the speed from 20 to 80, as a speed of 150-180 appeared quite unnatural for a spinning ballerina and was too fast for the material to stay on properly.
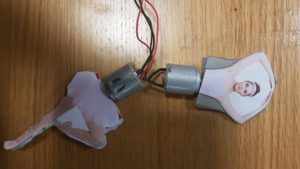
Sometimes, the motors wouldn’t be in sync so the lower and upper part of the ballerina can appear unnatural. Also, the gap of motors between the ballerina’s upper and lower body again appears unnatural, but I couldn’t think of any other alternative to solve this issue. Lastly, if I had more time, I would have liked to create a strong holder for the spinning ballerina, so I don’t have to use my hand to hold it together (which appears unprofessional and can create unreliable outcomes).
Making Interactive Art: Set the Stage, Then Shut Up and Listen
This article made me think about how we often present our projects in class. What if, instead telling others the purpose and how they are supposed to interact with the project, we simply let them interact, and then expand on their experience after? I resonated with the author’s claim how making interactive work can be difficult because we are taught that a work of art is a work of expression, it’s a statement. To “set up the stage” and let it be, or to suggest intentions without giving the interpretations, appears liberating, scary and un-doable all at the same time. I haven’t really made the shift of considering interactive media to be like a performance where the audience completes the work. This article made me more aware of how I perceive interactive media as an art form, and how I should perhaps begin to perceive it another way.
Physical Computing’s Greatest Hits (and misses)
I found it interesting how the author claimed that even though an idea has done before, it doesn’t mean you should give up on it. As someone who is new to physical computing, I try to avoid doing ideas that have already been executed because of the lack of originality it presents. But the author presented many creative ways of fulfilling the ideas that have already been done. He provided a creative account of physical computing instruments and discussed the advantages and disadvantages about them, which I found to be extremely useful and beneficial.
Stupid Pet Trick Project
The idea of my project derived from my strange tissue obsession. The concept was that every-time I would want to reach for the tissue box, it would move further away. I planned to achieve this using a photo sensor. While it moved away it would create a sneezing sound.
I started off with experimenting with the servos. Initially, Aaron told me that a student had done a similar idea and made the object ‘jump’ somehow. I had a difficult time creatively thinking about how to make the tissue box jump through the smaller servos we got in our Red SparkFun boxes. I couldn’t think of any mechanism to make the tissue box jump. Subsequently, I started looking at other servos in the lab and came across the continuous rotating servos, and found wheels that go along with it.
My plan was to put these two wheels alongside the tissue box. After consulting with Aaron about this idea, he said it would be better if I incorporated something within the tissue box, as putting wheels outside the tissue box would make the pet trick appear to obvious. Overall, it would defeat the purpose of a pet trick. I decided to put one wheel inside the tissue box.
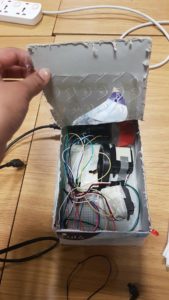
The challenging part about putting one wheel inside was that the weight was unevenly distributed, and the tissue box was elevated slightly, making one side lean towards the ground more than the other. When the tissue box would move, it would curve and not move in a straight line. I added a layer of cardboard to slightly even out the tissue box. If I had more time, I would incorporate small, rubber lego-tires on the bottom of the tissue box so the weight is not unevenly distributed and can move in a linear path rather than a curved one.
One of the most challenging parts of the project was coding the box to move back to its original position. Every time I attempted to create the timer or set the appropriate booleans to activate whether the box moves away/comes back, something went wrong with the code. Aaron really helped me get a better understanding of the logic behind the code. Two really important takeaways from this process was that 1) Instead of trying to write code directly on the application, it’s better to take a piece of paper and understand the logic behind it first, and 2) Always check your code step by step instead of all in one go (which is usually what I do). It only becomes more challenging to debug it that way.
Another challenge was trying to add the sound effect. I used an Arduino Due and Wifi Shield. I looked at various demos online, however one of the necessary import libraries was not working, which wouldn’t allow the audio to work. I tried using other materials from the lab, such as the AUX jack breakout, but there was limited information on how to use them with the combination of materials I had. My last option was to directly connect the speaker to the board, but I had read controversial reviews on how that could be dangerous so I chose not to for the efficiency of the board. I was quite disappointed that I couldn’t use the audio as I felt that it would have added a great touch to the piece. I used an LED as a substitute, signalling a red light every-time one tried to reach for the tissue box as a warning symbol. It wasn’t the best alternative. If I could get a hold of an MP3 shield next time, I would definitely add audio to my project.
*Note: I do plan on adding audio to my project on Monday/Tues (Mar 5/6. 2018), once I am done a couple of other important assignments over the weekend.
Assignment #4 – Lubnah & Kristopher
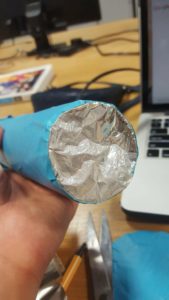
Creation of the rainstick:
We attached to toilet paper rolls together. Initially, we use tape to cover the open ends of the roll. However, that didn’t emphasise the sound clearly. It sounded quite dull when he aluminium balls hit the surface of the tape. So we ended up using aluminium to emphasise the sound further. We created a stand rainstick, however the weight of the rainstick was heavier than the stand, so we needed a platform, some sort of rectangular structure and weight in the empty space to balance the overall weight of the structure.
- Tissue paper rolls
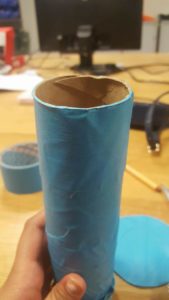 2. Creating the “drum-skin” for the rainstick
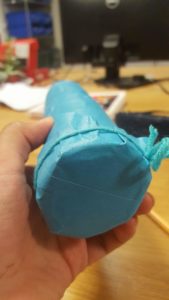
3. Rolled aluminium pieces to create rain-drop effect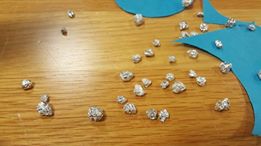
4. Final Structure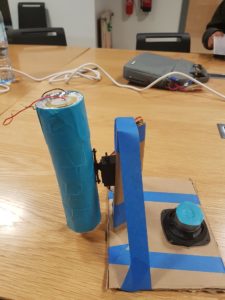
Ways of improving the project:
We attached a piezo element to one end of the rain stick to complements the sound of the rain stick. Ideally the piezo element would have reverberated with the end cap to turn the entire rain stick into a resonance chamber, but we could not get the aluminum sufficiently tight.
We used the example code for the servo, modified to pause at each end and allow the rain stick to come to equilibrium. Ideally we would have rungs throughout the rain stick to increase the noise it makes, but they are not present in this version.
The musical melody was made extremely last minute, and it was quite upbeat. It did not provide the relaxing tone needed for an effective soundscape. Next time, ideally we would spend more time focusing on the quality of the musical piece to genuinely resemble an accurate sleep soundscape.
“Responses: A Brief Rant on the Future of Interactive Design” Response
I appreciated the question on whether Victor was advocating for further use of the stylus, physical keyboard, sticks and rocks. He answered that he was not, that he was advocating for a dynamic medium to see, feel and manipulate things. I wish Victor went further into explaining what he meant by this dynamic medium, although it was a ‘rant’ and there was a point in him providing no solution, I was hoping he could still provide some sort of example for greater understanding of his argument. I also found Victor’s view on “Waving My Hands In The Air” interesting, he didn’t find it positive as it throws off one’s proprioceptive senses. Lastly, I found the “finger-blind” comment interesting as I have noticed people believe in the intelligence of the human species when they see scenarios such as little kids playing with an iPad. They view the action with a sense of pride. However, if we don’t use our fingers in childhood, the rich network of nerves become impoverished which actually has an impact on one’s development. Intelligence can be misused in so many ways.
A Brief Rant on the Future of Interactive Design Response
Victor makes a compelling argument on how the central component of interactive future are hands. I had never considered his claim on how most future interaction concepts completely ignore the use of hands, which feel and manipulate things. I took my hands for granted when considering interactive design, and didn’t realise the potential they hold to revolutionise interactive design. The debate on whether to get rid of tactile for the visual was fascinating. There is so much information that the senses in our hands and fingertips receive, I am curious as to how we came to the stage where we began to aim for a “less dynamic” medium. One of my favourite quotes from Victor that accurately summarises his argument is, “claiming that Pictures Under Glass is the future of interaction is like claiming that black-and-white is the future of photography”.